General tab |

|

|
|
General tab |

|

|
Usage:
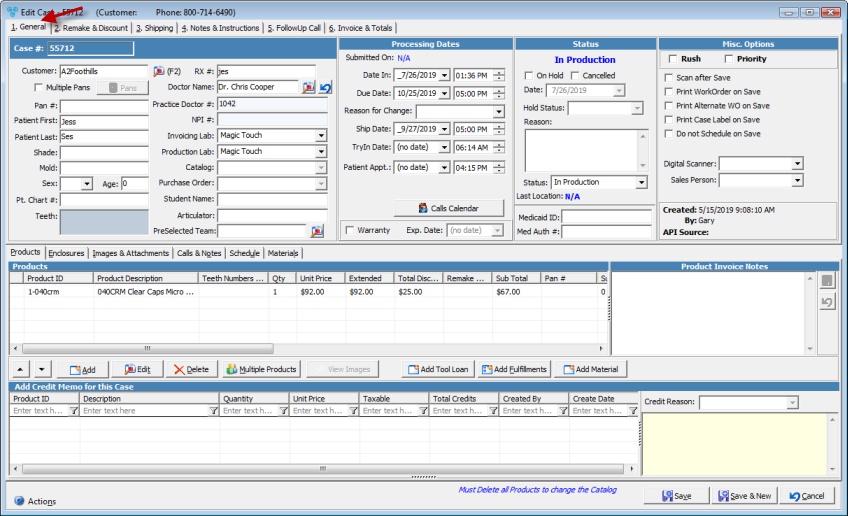
This tab contains the basic information regarding the Customer, Patient, Doctor, Lab, Catalog, as well as the Processing Dates and the Case status.
Navigation: See Add new Case

1. General tab
•Case Number is the first field. If the Case is being created, the Case Number shows <NEW>. After saving the case, a case number is assigned, which will be displayed further in this field. •Customer ID is populated by default with the corresponding Customer name. However this field can be changed: ➢Click on ➢Select another customer on Select a Customer for this case form. ➢Customer is changed and the case will be saved on the newly entered customer form. •Multiple Pans - you may add multiple pans by checking the checkbox and entering Pan Numbers, or you may leave the checkbox unchecked and enter value in Pan # field •Patient Name - Enter Patient First and Last name. Once fields are populated the system searches for cases added previously for this patient. If cases are found, then a message is displayed on the bottom of the form: There are ... other case(s) for this Patient. •Shade - enter shade details •Mold - enter mold details •Sex - select patient gender •Age - enter patient age •Pt. Chart # - enter patient medical record number •RX # - enter medical prescription number •Doctor Name - Doctor name is populated by default with the name set as default on Practice Doctor form. You may change it if necessary: ➢Click on ➢Select another doctor on Select Practice Doctor form. ➢Doctor Name is changed. ➢You may revert to the default doctor by clicking on •Practice Doctor # - is populated automatically when Doctor name is entered. This number is generated when Practice Doctor record is created. •NPI # - National Provider ID (NPI) •Invoicing Lab - is displayed based on the options set on Customer > Main tab. Invoicing lab may be changed. There could be some restriction regarding invoicing labs, based on the settings made in File > Global Settings > Global > Case Options > Case Entry tab •Production Lab - Default Production Lab is set in File > Global Settings > Global > Case Options > Case Entry tab •Catalog - the Default catalog is set in Customer Settings > Lab Settings. Catalog can be changed only if there are no products added to the case. You must delete all products to change the catalog. •Purchase Order - are entered in Customer Settings > Purchase Orders. You have there an option to allow only products from purchase orders when entering a case. •Student Name - enter student name •Articulator •PreSelected Team |
•Rush - This option has no other effect on the case other than allowing the user to prioritize the case if necessary. Please read here more info. •Submitted on - populates when case is submitted via Customer Portal •Date in - populated with current date (date when the case is entered) •Due Date - if not set in File > Global Settings > Global > Case Options > Case Entry tab, you can enter it manually. Represents the date when the case is due. •Ship Date - if not set in File > Global Settings > Global > Case Options > Case Entry tab, you can enter it manually. Represents the date when the case needs to be shipped. Please Note: Ship date cannot pass Cutoff Time or Due Date •TryIn Date: set date •Patient Appt: set date •Est. Delivery Date •Warranty - you can mark a case to set a warranty and specify an expiration date for the warranty offered. When remaking a case, the warranty status is now displayed including “No Warranty”, ”Warranty Expired”, or “Under Warranty.” •Warranty Exp. Date |
•On Hold - On Hold status is created to represent the on hold cases. Date, Hold status and Reason depend on the option selection. Please read here more info. •Cancelled - Cancelled status is created to represent the cancelled cases. Date and Reason depend on the option selection. Please read here more info. •Hold Status •Reason •Status - Please read here more info. •Last Location - Location can be set after the case is saved on Customer > 4. Cases > Select case > Click on Audit Trail tab > Right Click > Set Case Location •Medicaid ID •Med Auth # |
•Scan after Save •Print WorkOrder on Save - if checked, will print the WO after case is saved. You may set to print the WO automatically when new case is created in File > Global Settings > Global > Case Options > Case Entry tab •Print WorkOrder on Save •Print Case Label on Save - if checked, will print the Case Label after case is saved. You may set to print the Case Label automatically when new case is created in File > Global Settings > Global > Case Options > Case Entry tab •Do not Schedule on Save - if checked the case will not be scheduled when saved •Digital Scanner - select from dropdown. Digital scanner record must be entered here previously. •Sales Person - select Sales person. Make sure you have previously entered the list of sales people here. •Created - displays the date and time when case is created •By - the user name which created the case is displayed •API Source - will show where a Case was generated from, i.e. Customer Portal, Lab, etc |
See also: