Shipping Manager |

|

|
|
Shipping Manager |

|

|
Usage:
The Shipping Manager is designed to allow laboratories to separate the invoicing and shipping processes and to provide a view of pending shipments. This module will display all invoiced cases by customers, carriers, and service types along with the minimum ship and due date. It also displays the list of potential cases to be bundled as well as hint if the invoice can be held back for bundling purposes.
The Shipping manager may be used with other carriers than UPS & FedEx for purpose of updating the invoices with their respective tracking numbers.
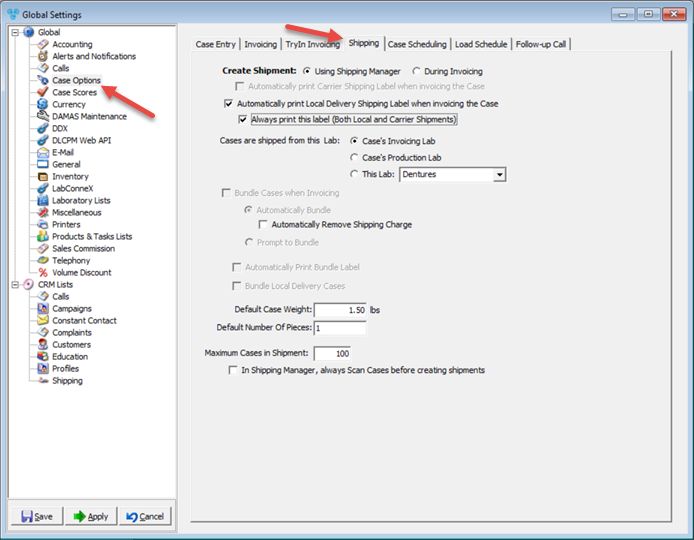
To avoid creating shipments automatically on case invoicing, navigate to File > Global Settings > Global > Case Options > Shipping and select the Create Shipment Using Shipping Manager option.

Case Options - Shipping
Once this option is selected, cases are stored in the Shipping Manager form after they are invoiced until a user creates the shipment manually through the Shipping Manager.
Prerequisites:
➢ Invoiced cases that need to be shipped by a Carrier. For information on how to Invoice a case please read here.
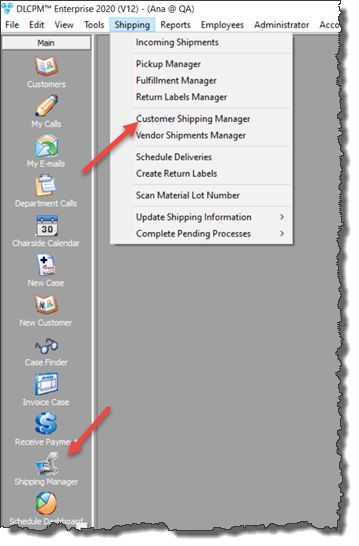
Navigation: Shipping > Customer Shipping Manager or click on Shipping Manager icon in the Main menu

Shipping Manager navigation

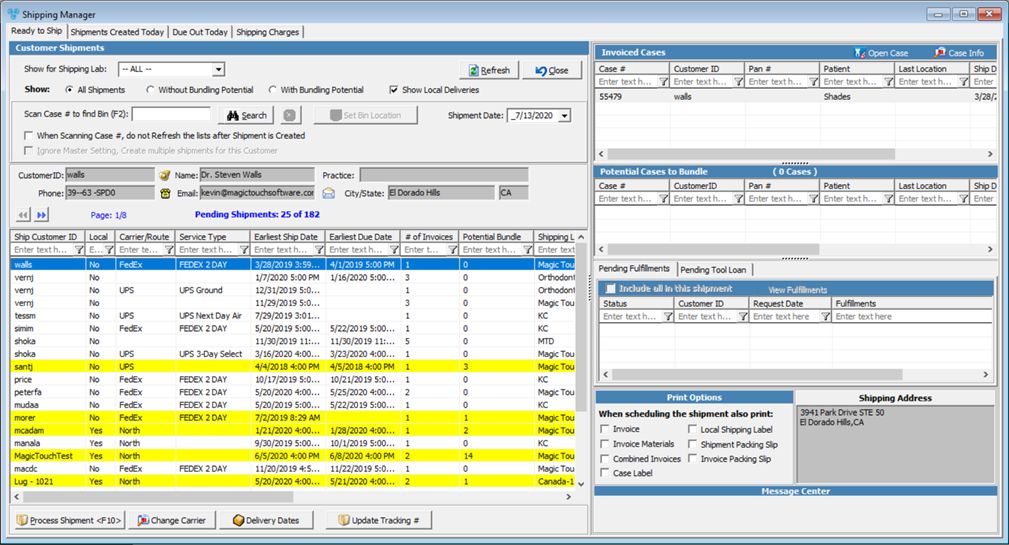
Shipping Manager form
Once ready, users may create shipments by customer, which will perform the following:
➢Create a shipment and print the shipping Label.
➢Print Invoice, Invoice Materials, Combined Invoices,Case Label, Local Shipping Label, Shipment Packing Slip or Invoice Packing Slip (All are optional and can be selected in any combination).
➢Upon shipping, all cases are updated with the corresponding tracking number.
The first tab has the option to Ready to Ship option. ➢Customer Shipments - This is divided into following sections: •Search area- Located at the top of the Shipping Manager is a drop down list which allows users to view shipments by a specific Shipping Lab and directly below are three radio options to view All Shipments, Shipments without Bundling Potential, or With Bundling Potential . After Search is performed, the number of Pending Shipments is displayed. •Verify Shipment status by scanning the Case Number - this option verifies if a shipment that has been added to the shipping manager form. This option allows scanning the barcode of a recently invoiced case to find out if this is the only case in the shipment or how many other invoices have been completed. This option eliminates the need to search through the entire list of shipments in the shipping manager. Once the case is found you can Set Bin Location. •Customer Details - displays customer ID, name, phone, email and the city of the customer that corresponds to the selected record. You can easily contact the customer from this form by clicking on: ➢ ➢ ➢ •Grid - displays all shipments that correspond to the search criteria. Please Note: If one Customer has more than one case ready to be shipped to the same address with the same Carrier, then all cases will be shipped at once. There will be a single record in the Customer Shipment form including all cases that have the same particularities. Please Note: A software lock has been added to warn users that someone else is creating the same shipment. Shipment color will be Red if locked by another user ➢Invoiced Cases - Shows a list with the cases that correspond to the selected shipment. You can Open a selected case or just see Case Info. ➢Potential Cases to Bundle - Shows a list with other cases that may be bundled together with the one(s) that are already included in the selected shipment ➢Pending fulfillments to include in this shipment. Display fulfillment items. A button is added to view fulfillments. A checkbox option has been added to include all items in the shipment: •When the shipment is created, if this check box option is checked, all fulfillment records are updated with Tracking #, Carrier, Service Type, and Completion info. •If the shipment is Local, the Route and Delivery ID are updated. ➢Pending Tool Loan to include in this shipment. Display loan items. A button is added to view tools. A checkbox option has been added to include all items in the shipment: •When the shipment is created, if this check box option is checked, all tool loan records are updated with Tracking #, Carrier, Service Type, and Completion info. •If the shipment is Local, the Route and Delivery ID are updated. Please Note: The message that would display in the Message Center of the shipping manager regarding the select customer's fulfillments is in a separate section underneath potential cases to bundle. In this section, users can select the View Fulfillments option to open the fulfillment manager. ➢Print Options - All options are for printing. You can decide what to print when scheduling the shipment by checking the boxes. ➢Shipping Address - Displays the address where the case is to be shipped ➢Message Center - displays shipping info ➢ ➢ ➢ ➢Finally you have an option to Ignore Master Settings, Create multiple Shipments for this Customer.
The second tab is Shipments Created and will display the invoices already shipped for the current day. The listed shipments may be voided in the event that a case needs to be un-invoiced for modification. The form is divided into: ➢ Customer Shipments - with: •Search area- Located at the top of the Shipments Created tab is a drop down list which allows users to view shipments by a specific Shipping Lab. •Customer Details - displays customer ID, name, phone, email and the city of the customer that corresponds to the selected record.You can easily contact the customer from this form by clicking on: ➢ ➢ ➢ •Grid - displays all shipments that correspond to the search criteria. ➢Cases in Shipment - Shows a list with the cases that correspond to the selected shipment. You can Open a selected case or Remove Case from Shipment. ➢Invoiced Case without Shipment - Displays a list with invoiced cases that could be sent with the selected shipment. You can Add this case to the selected Shipment ➢Shipping Address - Displays the address where the case is to be shipped ➢ ➢
Third tab is Shipment Due Out Today - displays a grid that includes cases with Due Date of today or earlier, and Due Date of tomorrow when shipped by Carrier. You can Open a selected case or just see Case Info. |
Last tab is Shipping Charges with a grid with info.
Available Operations:
1.On the Ready to Ship tab scan the barcode of a case that was recently invoiced. 2.Click on 3.Enter Case Location on Case Location form. 4.Click Note: In order to have available Locations please make sure you entered them previously in File > Global Settings > Global > Laboratory Lists > Case Locations section. |
You can see case details by selecting the case and then : •click on •or click on |
This button will manually create the Shipment. To ship the cases: 1.On the Create Shipments tab select the shipment in grid by clicking on it. 2.Click on 3.If the shipment is Local then the following form will open:
Create Customer local shipment 4.Select the Route and click on 5.If the Shipment is not Local then the following form will open:
Create Customer Shipment form 6.Select Update Shipping info if you have an existing Tracking Number, otherwise select Create Shipping Label. 7.If you Create the shipping label then you can: •Select Shipment Date •Select Scale - check only to change the scale •Enter weight or click on the •Select the Service Type. •Select Package Type - If supported by the Carrier, a drop down would allow selecting the package type. The shipping charge may be lower in some cases like Envelope. •Set COD Amount - If supported by the Carrier and if the customer is set to COD, this option will be available. The COD amount is set to total charge for all cases in the shipment. If this COD Amount is set you can check next option to Accept guaranteed fund only (Money Orders, Cashier Checks). •Enter an Insured Value. You can set the entered value to be the default value for the following shipments by checking the Always default to this value box. •You may Also create and print return labels. Just check the option and enter the number of labels you want to print. 8.If you Update Shipping Info then you can: •Enter Tracking Number. •Check Hold on Carrier Location if this is the case. The shipment will be held for customer pickup at the nearest location office to the shipping address. Customers should always check with the carrier to identify the location. •Require Signature. •Check Saturday Delivery if case is shipped on this day. •Add shipping charge. Select Shipping Product. You can manually enter Rate or you can Obtain rate from Carrier. The Rate represents the amount for shipping charge. After selecting the Shipping Products, users are able to change the amount. This is particularly useful if you are bundling several cases which will increase the weight and additional shipping charge is required. When checked, 2 radio buttons are enabled: oAdd Shipping Product to first Case - The shipping charge is added to the first case in the shipment oAdd Shipping Product to Case # - You can do this by clicking on 9.Click on Note: The shipment will be displayed on the second tab and can be voided the same day if necessary. |
1.On the Create Shipments tab select the shipment in grid by clicking on it 2.If the shipment is Local then •Click on the option.
Change Shipment Route •Select New Route. •Click 3. If the shipment is Not Local then •Click on the option.
Change Shipment Carrier •Select Carrier and Service Type. •Check Apply to all Shipments for this Customer if you want to make this change to all available shipments for the selected Customer. •Click |
This option will cancel the selected shipments and will send back all cases. 1.On the Shipments Created tab select the shipment in grid by clicking on it. 2.Click on 3.Select Yes when prompted for confirmation. 4.The Shipment will be voided and redisplayed on the Ready to Ship tab. |
This option will print the shipment packing slip 1.On the Shipments Created tab select the shipment in grid by clicking on it. 2.Click on 3.The Shipment packing slip is printed. |
Re-Print Label - This option will allow to reprint local or carrier labels 1.On the Shipments Created tab select the shipment in grid by clicking on it. 2.Click on 3.The Shipment label is reprinted. |
This option allows users to cancel the case from the selected shipment. The difference between removing a case from a shipment and voiding a shipment is that by removing a case from the shipment you are still able to ship the other cases that are included in the same shipment. 1.On the Shipments Created tab select the shipment in grid by clicking on it. 2.Click on 3.Select Yes when prompted for confirmation. 4.The Case will be removed from shipment and can be shipped again on the Ready to Ship tab. |
This is the reverse operation for removing a Case from a Shipment 1.On the Shipments Created tab select the shipment in grid by clicking on it 2.Click on the Add this Case to shipment button. 3.Select Yes when prompted for confirmation. 4.The case will be added to the selected shipment and the shipment that was set for this case is removed from the Ready to Ship tab. |
Close - Clicking this button will close the Shipment Manager form
See Also:
Case Options > Shipping