Pickup Manager |

|

|
|
Pickup Manager |
|
|
Pickup Manager |
|
|
|
Pickup Manager |
|
|
Usage:
The Pickup Manager form displays details about the existing pickups records. Searchable fields are displayed on the form header followed by the customer information for which the pickups were created for. The customer's details will change when a pickup for a different customer is selected in the grid.
Having the customer's info displayed, you may Call or Send email to the customer directly from this page by clicking either of these ![]()
![]() icons.
icons.
Please Note: Configuring a few prerequisites are required to add or update a pickup record. Please make sure that you have the correct data entered in following forms before continuing:
Prerequisites:
➢Route -> Path: File > Global Settings > CRM Lists > Shipping > Routes
➢Carrier -> Path: File > Global Settings > CRM Lists > Shipping > Carriers
➢Route Drivers -> Path: File > Global Settings > CRM Lists > Shipping > Route Drivers
➢Delivery Zones -> Path: File > Global Settings > CRM Lists > Customers > Delivery Zones
➢Drivers -> Path: File > Global Settings > CRM Lists > Shipping > Route Drivers
Navigation: Shipping > Pickups Manager

Pickups Manager navigation
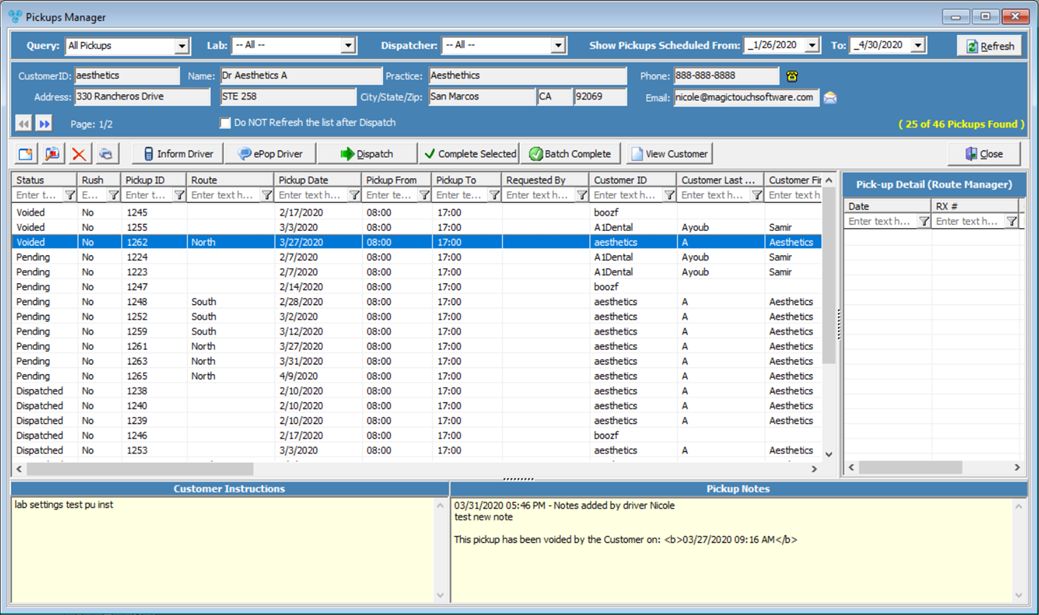
Pickups Manager form
Pickup records can be displayed based on the selected query and at the time these pickups were scheduled. For example if you wish to see the pending pickups in the last month select Pending Pickups in the query drop down field and select the dates in the Show Pickups Scheduled From and To accordingly. All pickup records that meet any criteria specified will be displayed in the grid. Also you may select pickups of a specific Invoicing Lab.
Available operations:
1.![]() - Add - This button allows adding new pickups for a specific Customer. For more information please review the Create Pickup section.
- Add - This button allows adding new pickups for a specific Customer. For more information please review the Create Pickup section.
2.![]() - Modify - This button enables the user to update a selected record. For more details please review the Update Pickups and Local Deliveries topic.
- Modify - This button enables the user to update a selected record. For more details please review the Update Pickups and Local Deliveries topic.
3.![]() - Delete - This button will delete the selected pickup record.
- Delete - This button will delete the selected pickup record.
4.![]() - Print Pickup Slip - This button prints a pickup label for the selected pickup record.
- Print Pickup Slip - This button prints a pickup label for the selected pickup record.
5.![]() - Inform Driver - This button will send a message to the driver. A new form will open and the appropriate driver can be selected.
- Inform Driver - This button will send a message to the driver. A new form will open and the appropriate driver can be selected.
6.![]() - ePop Driver - This button will send a message to the driver. A new form will open and the appropriate driver can be selected.
- ePop Driver - This button will send a message to the driver. A new form will open and the appropriate driver can be selected.
7.![]() - Dispatch - When you select a Pending Pickup and click this button the pickup status will change to display Dispatched.
- Dispatch - When you select a Pending Pickup and click this button the pickup status will change to display Dispatched.
8.![]() - Complete selected- When you select a Pending Pickup and click this button the pickup status will change to Complete.
- Complete selected- When you select a Pending Pickup and click this button the pickup status will change to Complete.
9.![]() - Batch Complete- Instead of completing a pickup one by one, you may click this button to complete the entire batch of pickups shown in the grid.
- Batch Complete- Instead of completing a pickup one by one, you may click this button to complete the entire batch of pickups shown in the grid.
10.![]() - View Customer - Clicking this button will open the customer form and will display all information related to the customer that corresponds to the selected pickup.
- View Customer - Clicking this button will open the customer form and will display all information related to the customer that corresponds to the selected pickup.
11.![]() - Close - This button will close the Fulfillment Manager form.
- Close - This button will close the Fulfillment Manager form.
See Also: