Pickups and Local Deliveries |

|

|
|
Pickups and Local Deliveries |

|

|
Usage:
Local Case Pickup and Delivery Management has never been easier or faster to create, track, and complete for scheduled or routine local pickups for all of your doctors even while they wait on the phone. Once entered in the system it is so simple for your staff to view all requests in one central place while allowing the rest of your staff to instantly view any status changes.
Prerequisites:
Before configuring any settings on this page please make sure you have already added the necessary prerequisites to the database such as:
➢Route -> Path: File > Global Settings > CRM Lists > Shipping > Routes
➢Carrier -> Path: File > Global Settings > CRM Lists > Shipping > Carriers
➢Route Drivers -> Path: File > Global Settings > CRM Lists > Shipping > Route Drivers
➢Delivery Zones -> Path: File > Global Settings > CRM Lists > Customers > Delivery Zones
➢Delivery -> Path: Shipping > Schedule Deliveries
Navigation: Customers > Customer tab > Pickups and Local Deliveries

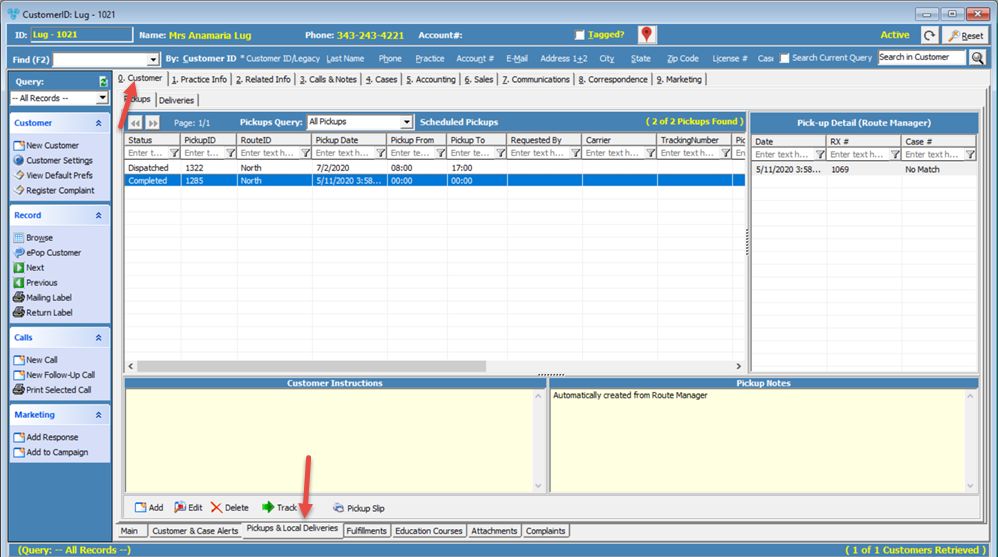
Pickups and Local Deliveries form
The Pickups and Local Delivery form has two main sections:
➢Pickup - This tab contains all existing Pickups. The Query in the header allows users to filter the pickups depending on the available query options.
➢Deliveries - Delivery records are listed in this tab and can be only viewed and deleted. Delivery records are created on Shipping Manager when the Local Delivery case is shipped.
1.On the Pickups and Local Deliveries form, navigate to the Pickups tab and click on the
Add Pickup form opens 2.All Customer Information is populated by default, including Pickup Address. 3.Some Customers may have practice doctors at different addresses. You can enter the Practice Doctor by clicking on 4.Enter the Pickup Information. Select the pickup type and fill in the necessary data: ➢Schedule Date is populated by default with today's date. ➢Local Pickup •Select the option for PM Pickup if you wish to schedule the pick up for the afternoon. •Enter the Route and Sequence. If these two fields were populated in Pre-Schedule Local Pickup section then they are already populated with the appropriate information. •Pickup Deadlines are displayed under Pickup for Lab dropdown. These are set in 0.Customers > Practice Info form previously. Note: Pickup deadlines only display for local pickups. •A message can be sent to the driver by checking the Text Message Driver or ePop Driver and selecting the driver name from the drop down list. If there is no driver name in the list you can add them in File > Global Settings > CRM Lists > Shipping > Route Drivers menu. •Also the manager can be notified if the Alert Dispatcher Using option is checked and a notification method is selected. •You can Print Local Pickup Slip right after the pickup is created by checking this option. Note: The Pickup Slip can also be printed any time later by selecting the pickup on Pickups and Local Deliveries tab under Customer form and clicking on ➢Carrier Pickup •If this option is selected then the Carrier should be selected in Carrier drop down field and also a Service Type. Note: For any carrier other than UPS and FedEx Service Type should be entered by following this path: File > Global Settings > CRM Lists > Shipping > Carriers Service Types. •Select one option between Dispatch only and Dispatch and Schedule. •The last two options refer to the Label, which you may choose to Open Label After Save and Email Label to Customer. •Tracking number. 5.Select the Lab for the Pickup. 6.A Pickup Time must be entered, however these fields are populated by default with the values set in Pre-Schedule Local Pickup section but they may be modified. 7.Enter information about the package such as Weight and Number of packages. 8.Select the option to Rush this delivery if needed. 9.Enter the name of the person who requested the pickup in the Requested By field. 10. The Default Status will display Pending. 11.Customer Instructions are displayed. These are populated from instructions entered in the Customer Settings > Lab Settings > Pickup & Shipping. 12.Enter any necessary Pickup Notes. 13. Click |
1.On the Pickups and Local Deliveries form, on Pickups tab, select the record you wish to update and click 2.Any changes can be made in the Pickup Information section. 3.Other than the already populated fields on pickup creation there is a new field now called Tracking #. If a Carrier is selected you may enter the Tracking number and keep an eye on the pickup later. 4.Click |
1.On the Pickups and Local Deliveries form, on Pickups tab, select the record you wish to delete by clicking on it. 2.Click 3.Select YES when prompted for confirmation. Note: The record will be deleted from the database, but you may add it back at any time. |
1.On the Pickups and Local Deliveries form, on Pickups tab, select a pickup. 2.If the Pickup has a tracking number click on 3.Information about the pickup will display in your Internet browser. |
1.On the Pickups and Local Deliveries form, on Pickups tab, select a pickup. 2.Click 3.The label will be printed and looks like this:
Pickup Slip Note: The Slip will be printed automatically when pickup is scheduled if the Print Local Pickup Slip option is checked before saving. |
1.On the Pickups and Local Deliveries form, navigate to the Deliveries tab.
Deliveries tab on Pickups and Local Deliveries form 2.Deliveries are entered in Shipping > Schedule Deliveries, so in order to view the record on Delivery tab on Customer form please make sure to schedule deliveries previously. 3.Information about the Local Deliveries and Case in Delivery are shown here. 4.Two options are available on right click:
|
See also: