1.Practice Info |

|

|
|
1.Practice Info |

|

|
Usage:
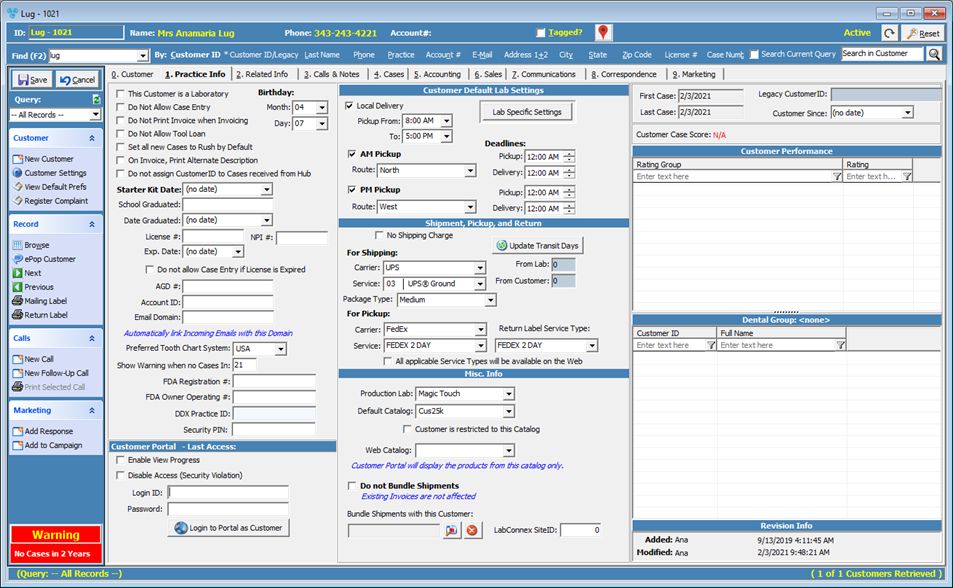
There is a tab on the customer form called Practice Info. Here is where you enter information about the customer's education, birthday, preferred tooth chart, set the web access information, and more. You can also check the customer creation date, first case date, customer score, and see the list of all customers who belong to the same group.
Navigation: Customer > 1.Practice Info

Practice Info tab
1.First there are three options: •This Customer is a Laboratory - Check this option if this customer record is a Laboratory •Do Not Allow Case Entry - If this option is checked then cases cannot be created •Do not Print Invoice when Invoicing - If selected then the invoice will not be printed automatically when case is invoiced even if this option is selected in settings. 2.Customer Birthday: •Month •Day 3.Education info is next: •Starter Kit Date •School Graduated •Date Graduated •License # •NPI # : National Provider ID (NPI) - This field is available also for Practice Doctors. It is highly recommended that you require this info from your doctors. •Exp. Date of license number •Option Do not allow Case Entry if License is Expired is available to stop adding cases if customer no longer has a license. •AGD # 4.Account ID and Email Domain. 5.Preferred Tooth Chart System - Here is where you will select the tooth chart system that you wish to use 6.Show Warning when no Cases In... - enter number of days. If no cases were created during that time frame, then a message will be displayed on the Customer form. 7.FDA Registration # 8.FDA Owner Operating # 9.DDX Practice ID 10.Arkling Practice ID 11.Customer Portal •Enable View Progress - controls the customer's access in Customer Portal to view the list of tasks on a case and when they have been completed. To preview how the progress is shown in Customer Portal, click here and view the Case Details. •Disable Access (Security Violation) - if checked, the customer's access to Customer Portal will be denied. •Login ID: ID for the customer to use in order to log into the Customer Portal. •Password: Password for the customer to use in order to log into the Customer Portal. 12.Customer Default Lab Settings: •Check the Local Delivery box if all deliveries performed for this customer are Local. • •Enter Pickup hour range •Select AM Route •Check PM Pickup if this is an option •Select PM Route •Four fields specify Deadlines for AM/PM and Pickup and Delivery. This will assist the customer service when scheduling pickups. 13.Shipment, Pickup and Return •No Shipping Charge - if checked then the Shipping costs will not be charged •For Shipping: ➢Carrier - select from dropdown ➢Service - select from the available ones ➢Package Type - select type from the dropdown. •For Pickup: ➢Carrier - select from dropdown ➢Service - select from the available ones ➢Return Label Service Type ➢All Applicable Service Types will be available on the web 14.Misc Info: Please note: The following info is set in Customer Settings module: •Production Lab - if you have no option to select please make sure you enter the info on File > Global Settings > Laboratory lists > Laboratories. Make sure that the lab has the This Lab is for Production option checked otherwise it will not be displayed in this field. •Default Catalog -- if you have no option to select please make sure you enter the info on File > Global Settings > Products & tasks Lists > Catalog Products •Select Customer is restricted to this Catalog if you wish that only the products entered in the selected catalog will be available. •Web catalog - select the catalog for Customer Portal. If you select any catalog, the Customer Portal will display products from this catalog only. •Do not Bundle Shipment - if checked then shippment will not be bundled •Bundle Shipment with this Customer ➢Add Customer by clicking on ➢Remove Customer by clicking on •Lab Connex SiteID 15. Information about First Case and Last Case are displayed. 16. Date when Customer was created is displayed in Customer Since field. 17. Customer Score - is calculated based on Case Scores. To see case scores navigate to Customer > 9. Marketing > Overall Case Scores 18. Customer Performance is next 19. Dental Group - displays a list with all customers that belong to the same group as the current one. 20. Revision Info •Customer creation date is displayed in Added field •Last update date is displayed in Modified field
|
See Also: