Add/Edit/Delete Products
Usage:
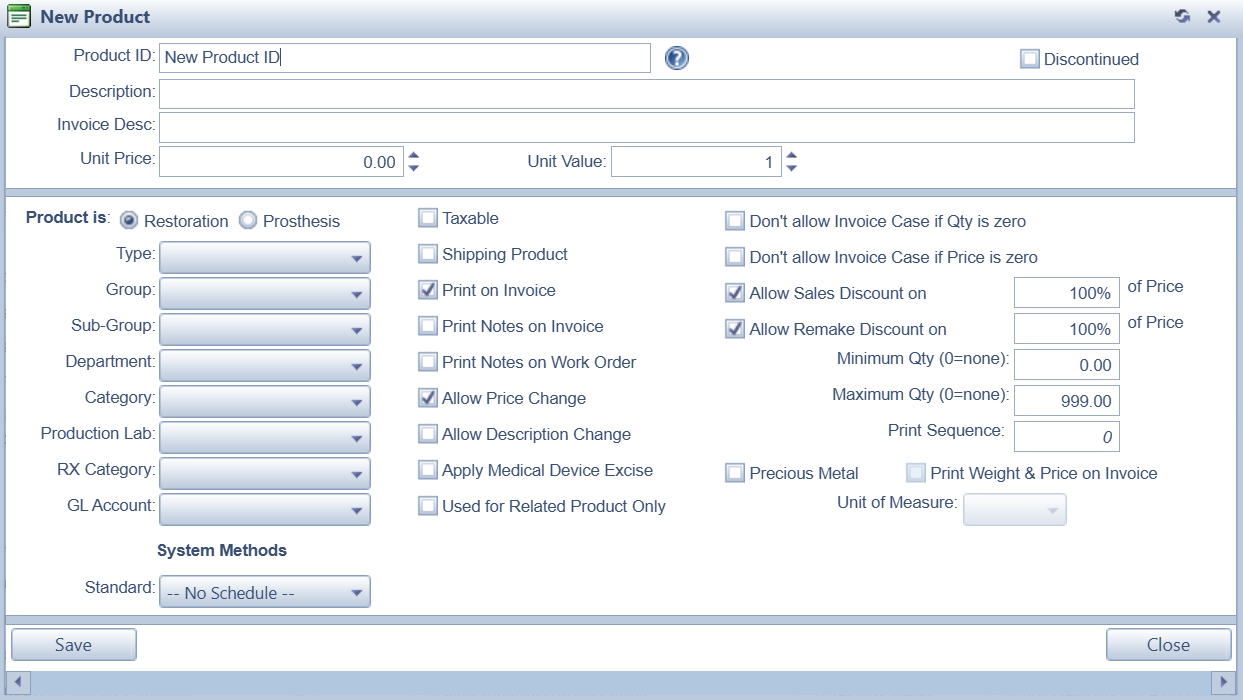
This feature is designed to create a record for each Product by entering the unique ProductID. This is the only mandatory field on this form. All other data and settings are optional and can be entered on creation or later while editing a product from the list.
In order to be able to enter all details on Products form, please make sure you have data entered on following tables: 1.Type -> Path: Administrator > Settings > Global > Products & Tasks Lists > Types 2.Group -> Path: Administrator > Settings > Global > Products & Tasks Lists > Groups 3.Sub - Group -> Path: Administrator > Settings > Global > Products & Tasks Lists > Sub-Groups 4.Department -> Path: Administrator > Settings > Global > Products & Tasks Lists > Departments 5.Category -> Path: Administrator > Settings > Global > Products & Tasks Lists > Categories 6.Default Production Lab - at least one Laboratory added on Administrator > Settings > Global > Laboratory Lists > Laboratories form 7.RX Categories -> Path: Administrator > Settings > Global > Products & Tasks Lists > RX Categories. |
Navigation: Administrator > Settings or  on Home Page then Global > Products & Tasks Lists > Products

Products form
To add a product you need to follow three steps, but usually additional details are necessary to make desired operations with these products. Bellow you can see how a product can be created and what are the settings that you can do.
-> Add a product
At this point you have added a Product to the database that has only its ID defined. All other options on this form can be added and modified now or later.
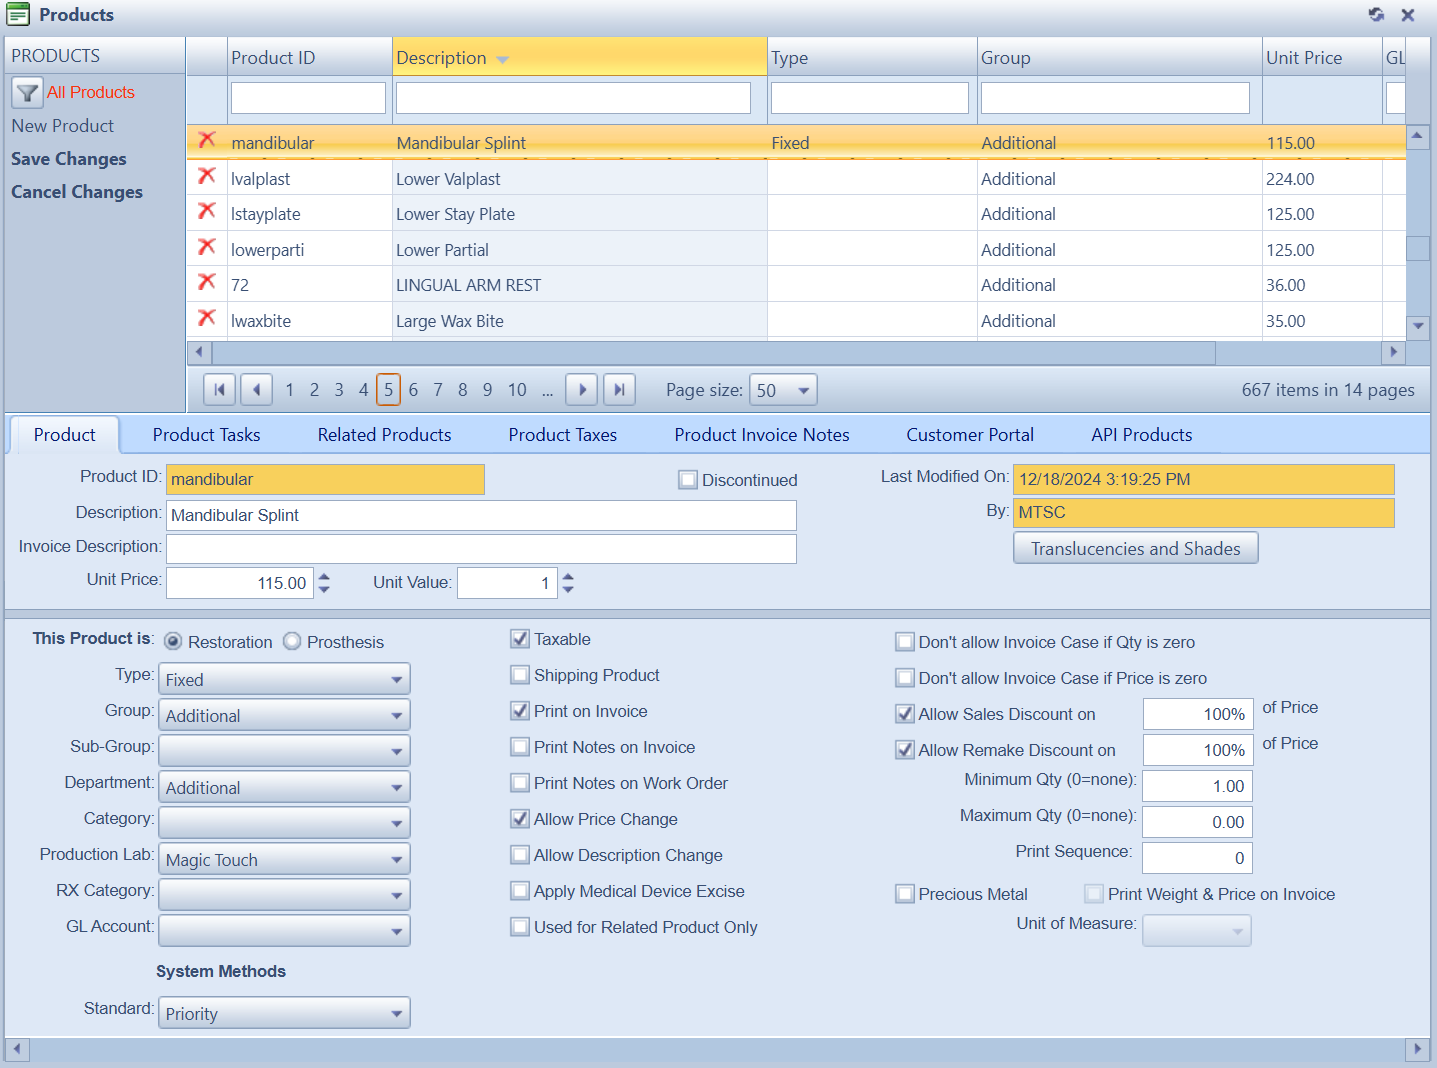
-> Enter additional details on Product tab - the following field description refers to the first tab of the product form, called Product. See other topics that describe the next tabs: Product Tasks , Related Products , Product Taxes, Product Invoice Notes, Customer Portal. 1.Product ID - is the first field and displays the ID entered above when Product was added. 2.Discontinued - can be checked if the product is not available at the moment but you don't want to delete it. While this option is checked, the product cannot be added to a case in order to be shipped. 3.Description - will be displayed next to Product ID and will give a brief description about the Product you entered. 4.Invoice Description - is the description that will be printed on invoices. 5.Unit Price - is the product selling price. 6.Unit Value - will be used for units sold reports. 7. Last Modify By - will be automatically populated with the name of the user that did the last updates and the date 8. Last Modify Date - will be automatically populated with the date when the last update was made 9.Translucencies and Shades - please read this topic for more details about how to assign translucencies and shades to a selected product. 10. Product is ➢ Restoration - when entering a Case, if the product is Restoration, user will be prompted to enter the tooth number ➢Prosthesis - if the product is Prosthesis, user may select Upper Arch, Lower Arch, or type a user defined text. 11. Type - select the product type from the drop down. If there is no value in the drop down field please add some in Products Type menu. 12. Group - choose a group if the product is part of one . If there is no value in the drop down field please add some in Groups menu 13. Sub-Group - this option relates to the Product Group. Along with Category, these groupings allow for further sales analysis and reporting options. If there is no value in the drop down field please add some in Sub-Groups menu 14. Department - Select the department for which this product has been added. If no department is available, please add one in Departments menu. 15. Category - This option allows for further sales analysis and reporting options. 16. Production Lab - select the laboratory where this product is created. If no laboratory is displayed in the field please add it in Laboratories form and make sure that the added lab is for production. 17. RX Category - select a category from the drop down. RX Categories should be already available if these were entered in RX Categories menu. 18. GL Account - Select an account from the drop down menu. 19. System Methods, Standard - Select a method to be used on the product. Methods can be added in the Production Methods menu. 20. Taxable - set this if Sales Tax applies for this product. 21. Shipping Product - is checked if the product is used in the delivery of another product or with any other product. If “When Saving a new Case with CARRIER Shipment, automatically add Shipping Product(s) or When Saving a new Case with LOCAL Shipment, automatically add Shipping Product(s) ” are checked in Administrator > Settings > General > Case Options > Case Entry menu, then all products that have Shipping Product option checked will be added to a newly created case when at least one product is added. 22. Print on Invoice - if checked then this product will be displayed on the invoice when printed 23. Print Notes on Invoice - if checked then any existing notes will be printed on the invoice. 24. Print Notes on Work Order - if checked then any existing notes will be printed on the work order. 25. Allow Price Change - if checked, the Unit Price can be manually changed when product is added to a case, otherwise Unit Price will be a read only field with the value set on this form. 26. Allow Description Change - occasionally, it may be necessary to modify the product description temporarily for the specific case at hand. This check box has been added to allow labs to mark certain products eligible for modifying the product description during case entry. 27. Apply Medical Device Excise - this checkbox has been added to identify the products that are subject to Medical Device Excise Tax (MDET). This options works independent of the Apply Tax checkbox. The State & Local taxes are calculated based on the Customer and Lab Taxes. ▪Product may be subject to State & Local Tax but not subject to MDET ▪Product may be subject to MDET but not subject to State & Local Tax ▪Product may be subject to both Taxes ▪Product may not be subject to any taxes at all 28. Used for Related Product Only - if this option is selected than the product is restricted to be used only as related product for other products. 29. Don't allow invoice Case if Qty is zero - prevents users from invoicing a case if the given product has a quantity of zero. This may be very useful for metal products where the weight is entered right before invoicing or this may generally be used to correct errors that could have occurred during data entry. 30. Allow Sales Discount on ... % of Price - if checked, Discount can be applied to the entered percentage of the product price. 31. Allow Remake Discount on ... % of Price - this options may be used to allow a remake discount on the product or allow up to certain percentage of the price. 32. Minimum Quantity - must be a positive numeric value that will indicate the minimum quantity that can be used on a case. 33. Maximum Quantity - must be a positive numeric value that will indicate the maximum quantity that can be used on a case. 34. Print Sequence 35. Precious Metal - check if this product is precious. Also decide if you want to ➢Print Weight & Price On invoice and enter ➢Unit of Measure - select from the drop down. For the changes to take effect and remain permanently, select the |
![]() How to make changes to a product on Products tab
How to make changes to a product on Products tab
You can do any changes at any time to all these fields, except Product ID, simply by entering the new value and clicking Save button after previously you have selected the record you want to modify. 1.Enter the new value in the field you want to update or just check/uncheck options. 2.Click Save Changes button on Product form and record will be saved with the new value that was entered. |
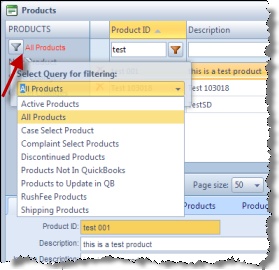
The list with the products is displayed on the top of the Products form You can search a product, or a group of products, that have at least one thing in common. 1.A simple way to find products is typing values in column headers. The matching requirements will be displayed automatically in the grid below. If no records are found the grid will be empty. 2.Other way to search for products is using query. Select a query from the drop-down list and products that meet the selected query will be displayed in grid .
Query on products form |
You have to make sure that the product you want to delete is not already added to a Case. 1.Select the Product you want to delete 2.Click on 3.Select Yes when you are asked for confirmation. Please Note: 1.Record will be delete permanently from the database. If you want to use it later you have to Add it again. 2.You cannot delete a product that has been used. Still, if the product no longer exist you can check Discontinued and click Save button. This way this product cannot be used anymore but will be not removed from the database. If later the product will be available again, just simply uncheck Discontinued option, Save and the product will be ready to use. |
See also:
Products for more options


