Usage: Products, enclosures, attachments and notes can be added to a case.
Navigation: Cases > New or Edit Case > Products tab
Create or open a case for edit. For more details about creating a case see How to create a case section.
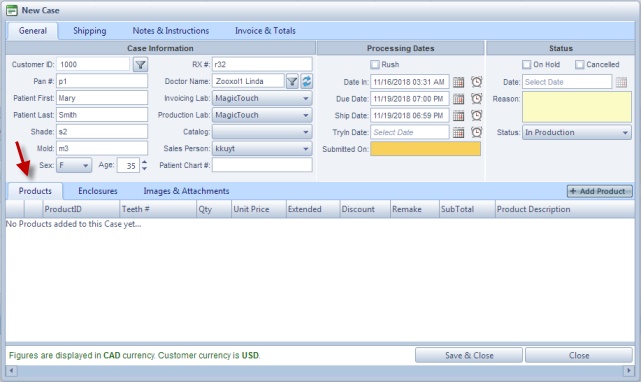
New Case form without any Product added yet
1.On the New Case form select Products tab and click  2.Select Case Product form will open. 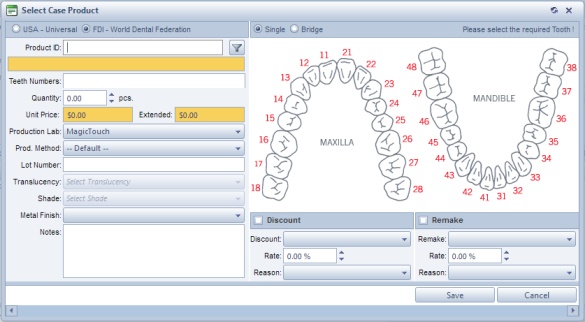
Select Case Product form
3.Tooth Chart System is selected based on the setting you made here. 4.Click on the  next to the Product ID field and the Select a Product form will open. next to the Product ID field and the Select a Product form will open. Note: This form contains all existing products. To find the product you wish to add more quickly, use the available filters from the header. You can filter the existing products by Type, Group and/or Department. Also if you are not sure of the spelling, only type the first few letters in Product ID or Description column headers and DLCPM will return all values that start with what you typed.
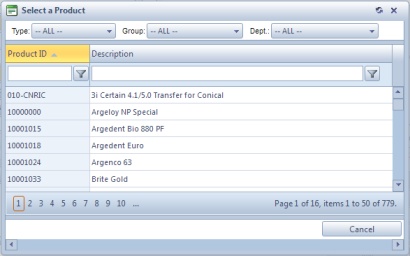
Select a Product form
5.Select the product you want to add and click on  6.Select Case Product form displays the selected Product and it's Description. 7.You can now click  to add the product to the case, or continue adding more info and options before the product is added such as: to add the product to the case, or continue adding more info and options before the product is added such as:
 Enter Teeth Numbers Enter Teeth Numbers
•If the Product is a Restoration product, then you can select teeth number. (Restoration is an option set on product settings) 1.Chart System is already set between USA-Universal and FDI - World Dental federation based on your choices made here. 2.On Select Case Product form , after the Product was selected you can select teeth from the right panel. 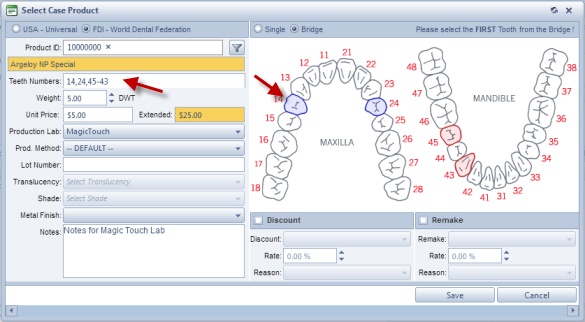
Tooth Chart panel
3.Choose the Selection Mode between Single tooth or Bridge. 4.Select the teeth. ➢If the Selection Mode is Single, simply select teeth from the tooth chart to add to the case product. Selected teeth will display in the Teeth Numbers field. ➢ If the Selection Mode is Bridge, simply select the first and last tooth of the bridge. All teeth between the selected range will be added. 5.Teeth numbers displays the selected teeth. Note: Once the teeth are selected the quantity changes. It becomes equal to the number of teeth selected. Extended also changes since is recalculated.
•If the Product is Prosthesis product, then you can select the arch. (Prosthesis is an option set on product settings) 1.Chart System is disabled. 2.Select Prosthesis. 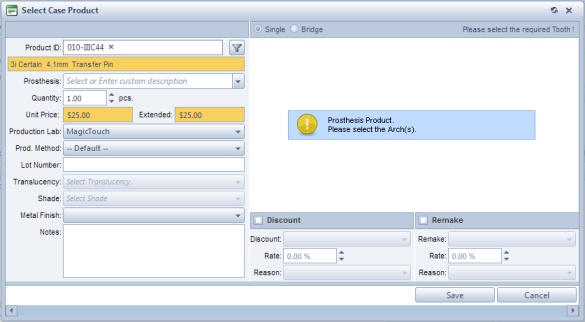
Prosthesis product
|
 Change Production Lab and add Notes and Lot Number Change Production Lab and add Notes and Lot Number
On Case Product form you can also change:
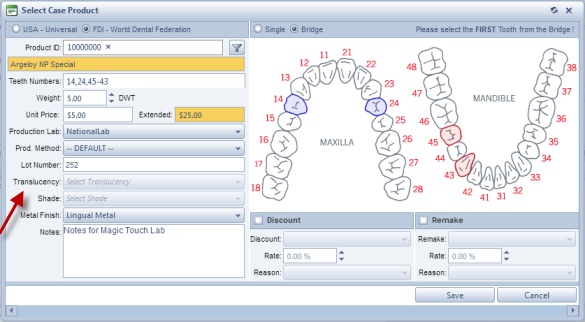
Case Product form with Product and teeth numbers added, and several changes made to other fields.
1.Production Lab - is the Laboratory where the product will be produced. It defaults to Case Production Lab, but can be changed if needed. 2.Production Method - Is DEFAULT, but also can be changed if the product has more than one method to be produced. 3.Lot Number - Users have the option to enter a lot number for the product here. 4.Translucency - If the selected product has Translucency then drop down list will be available. 5.Shade - If the selected product has Shades then drop down list will be available. 6.Metal Finish - If the selected product is Metal then drop down list will be available. 7.Add Notes |
 Add Discount Add Discount
1.On Select Case Product form you can add a Discount by checking the Discount box. Note: You cannot add both Discount and Remake to a product using this method.
2. Once the Discount is checked the Discount, Rate and Reason field will be enabled. 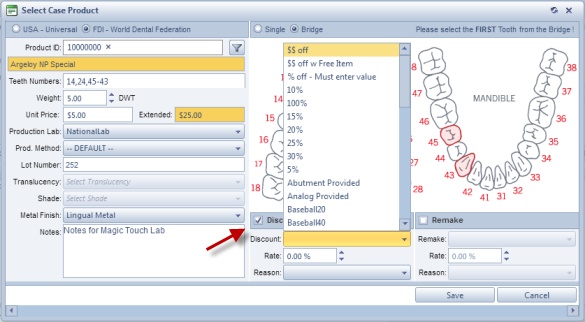
Discount options
3. There are two discount possibilities: •Add a Percentage Type Discount: ➢Select a Promotion Discount from the drop down list. ➢Rate will be added automatically and cannot be changed. Note: Next to the Rate field is the "%"(percentage) sign which will confirm that the selected Discount has Percentage type.
➢Enter Reason why will be this discount applied. •Add a Flat Amount Type Discount ➢Select a First Case Discount from the dropt down list. ➢Enter Rate value. This can be any value that is less than the Product's Unit Price. You cannot offer a greater discount than the initial price of the product. Note: Next to the Rate field is the "$" (dollar) sign which will confirm that the selected Discount has Flat Amount type.
➢Enter Reason why will be this discount applied. |
 Add Remake Add Remake
1. On Select Case Product form you can add a Remake by checking the Remake box. Note: You cannot add both Discount and Remake to a product using this method.
2.Once the Remake is checked the Remake, Rate and Reason field will be enable. 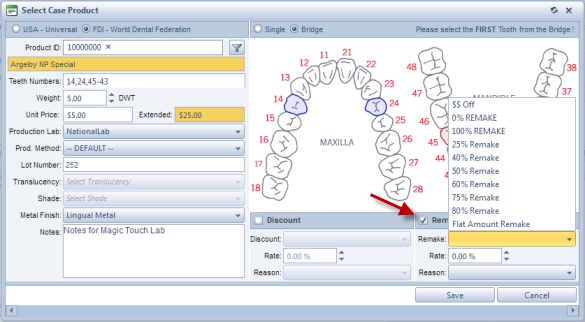
Remake options
3.There are two remake possibilities: •Add a Percentage Type Remake ➢Select a Percentage Remake from the dropt down list. ➢Rate will be added automatically and cannot be changed. Note: Next to the Rate field is the "%"(percentage) sign which will confirm that the selected Remake has Percentage type.
➢Enter Reason why will be this remake applied. •Add a Flat Remake Discount ➢Select a Flat Remake from the dropt down list. ➢Enter Rate value. This can be any value that is less than the Product's Unit Price. You cannot offer a greater remake discount than the initial price of the product. Note: Next to the Rate field is the "$" (dollar) sign which will confirm that the selected Discount has Flat Amount type.
➢Enter Reason why will be this discount applied. |
You can also add Notes.
After making all necessary modifications save the Product to the case. Users may add more products to a case by repeating the above steps. Products can be updated if the case is not invoiced. Case Number is saved on the Cases form. To see the products that are added to a case, select the case by clicking on it and then click on Products tab. Details of the products added will display in the grid.
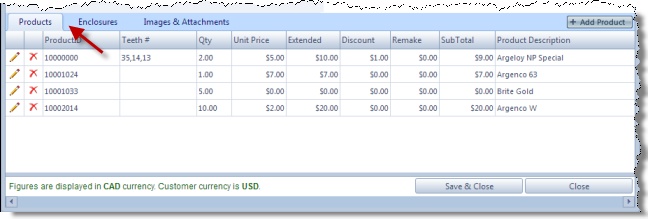
Product is added to case
|
Edit Case Products - please read this topic for details
Delete Products from the Case - please read this topic for details
See also:
How to add Enclosures to a case
Add Attachments to a Case


