Case Finder |

|

|
|
Case Finder |

|

|
Usage: This powerful search engine will help you find any case in DLCPM using various pieces of information including Case Number, Customer ID, Patient First Name, Patient Last Name, Pan Number, RX Number, Product ID and Reference ID. You can also specify a date range by Ship Date, Shipment Date, Due Date, Invoice Date, Date In, or TryIn Date. You can search by one or all of these case properties and DLCPM will return all of the relevant cases based on the values you enter. If you're not sure of the spelling, type the first few letters and DLCPM will return all values that start with what was entered.
Navigation:
Click on Case Finder icon in the left column Main menu, Case Finder option on Main menu |
or click View > Case Finder from the top row navigation, or hit F7 on your keyboard.
Case Finder option in View menu |
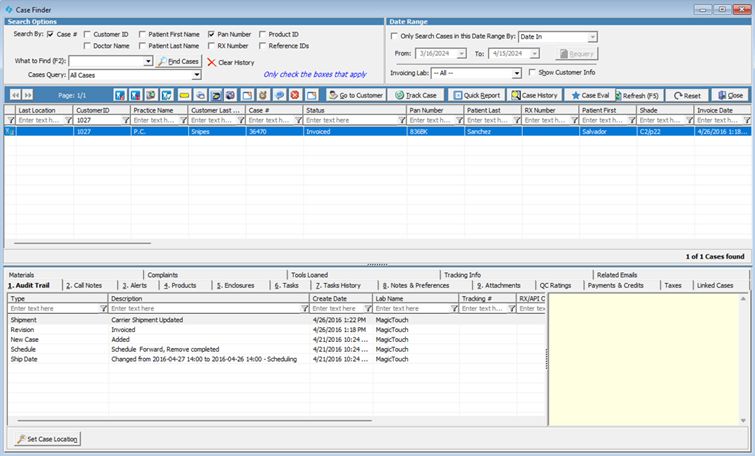
The Case Finder form opens:

Case Finder form
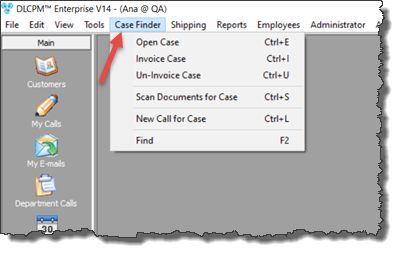
Please Note: Once Case Finder is opened, a new menu option will be available in the top row navigation:

Case Finder menu
Available Case Finder options:
➢ Search By - Choose which field you want to search by in the “What to Find” field. You can search by: Case Number, Customer ID, Patient First Name, Patient Last Name, Pan Number, Product ID, Doctor Name, Patient Last Name, RX Number, or Reference IDs. You can select one, some, or all of these fields that will be matched with the entered search key.
➢ What to Find - Enter the value to search for and click ![]() .
.
➢ ![]() - The Clear History option will clear the cache of any previously searched key terms.
- The Clear History option will clear the cache of any previously searched key terms.
➢ Cases Query - This list of predefined queries allows you to filter cases based on the query criteria, such as "Cases Invoiced Today." Select a query and the relevant cases will display in the grid.
•Date Range - This section allows you to search cases by dates. First, check “Only Search Cases in this Date Range By.” Then, select the Date Type from the drop-down menu and the "From:'" and "To:" dates. Click the Requery button to apply the date range filter. The available Date Types are Date In, Invoice Date, Ship Date, Shipment Date, Due Date, and TryIn Date.
•Invoicing Lab - Select a lab from the drop-down menu to only show cases that match the selected Invoicing Lab.
•Show Customer Info - Checking this box will populate the header with basic information about the customer corresponding to the selected case. This section also includes a read-only field that allows users to quickly access the case's Tracking Number. If no tracking number exists on the selected case, the Tracking Number field will appear blank.
•The search results grid includes several options in the header and the list of cases that match the search option that you entered. These options include:
➢ The Left and Right Arrows to navigate through the result pages and the Page Counter.
➢ Edit selected Case - ![]() - Opens the selected case for editing.
- Opens the selected case for editing.
➢ Invoice selected Case - ![]() - Invoices the selected case. You will be prompted for confirmation before the case is invoiced.
- Invoices the selected case. You will be prompted for confirmation before the case is invoiced.
➢ Un-Invoice selected Case - ![]() - Un-Invoices the selected case. This action can only be performed on currently invoiced cases.
- Un-Invoices the selected case. This action can only be performed on currently invoiced cases.
➢ Accept Case - ![]() - This will load the Accept Case form. This action can only be performed on cases with the Submitted status.
- This will load the Accept Case form. This action can only be performed on cases with the Submitted status.
➢ Add Metal - ![]() - Allows you to add metals to a case without opening the Edit Case form. For more details please see the Add Metal topic.
- Allows you to add metals to a case without opening the Edit Case form. For more details please see the Add Metal topic.
➢ Print - ![]() - Allows you to print Invoice, Invoice Material, Alternate Invoice, Packing Slip, Outsource Vendor Packing Slip, Workorder, Alternate Workorder, Case Label, Local Shipping Label, Carrier Shipping Label, Shipment Packing Slip, Combined Notes & History, Audit Trail, Incoming Shipment Case Label, Incoming Shipment Pan Label, and Customer Mailing Label.
- Allows you to print Invoice, Invoice Material, Alternate Invoice, Packing Slip, Outsource Vendor Packing Slip, Workorder, Alternate Workorder, Case Label, Local Shipping Label, Carrier Shipping Label, Shipment Packing Slip, Combined Notes & History, Audit Trail, Incoming Shipment Case Label, Incoming Shipment Pan Label, and Customer Mailing Label.
➢ Scan documents for selected Case - ![]() - Allows you to scan documents as attachments to the selected case if the computer has a document scanner attached to it with a TWAIN driver compatible with Windows.
- Allows you to scan documents as attachments to the selected case if the computer has a document scanner attached to it with a TWAIN driver compatible with Windows.
➢ Capture Image - ![]() - Allows you to select a video source device connected to your computer to capture images and attach them to the selected case. For more details please read this topic.
- Allows you to select a video source device connected to your computer to capture images and attach them to the selected case. For more details please read this topic.
➢ Create a New Call - ![]() - Opens a New Call form for the selected case. For more details about how to enter a call please see this topic, but disregard the navigation path since you have already opened the New Call form.
- Opens a New Call form for the selected case. For more details about how to enter a call please see this topic, but disregard the navigation path since you have already opened the New Call form.
➢ Create Alert for selected Case - ![]() - Allows you to create a new alert message for the selected case. Details of how to add a case alert are described here.
- Allows you to create a new alert message for the selected case. Details of how to add a case alert are described here.
➢ ePop Case Info - ![]() - Allows you to ePop the selected Case Number, Customer ID, and Doctor to a user, group, technician, or driver.
- Allows you to ePop the selected Case Number, Customer ID, and Doctor to a user, group, technician, or driver.
➢ Cancel Case - ![]() - Cancels the currently selected case.
- Cancels the currently selected case.
➢ Add Tool Loan - ![]() - Opens the Tool Loan form which allows you to add a tool loan to the selected case.
- Opens the Tool Loan form which allows you to add a tool loan to the selected case.
➢ Go to Customer - ![]() - Opens the Customer form for the customer corresponding to the selected case.
- Opens the Customer form for the customer corresponding to the selected case.
➢ Track Case - ![]() - Takes you to the selected case’s shipping carrier website to review the shipment tracking information, if the selected case has a shipping carrier tracking number entered.
- Takes you to the selected case’s shipping carrier website to review the shipment tracking information, if the selected case has a shipping carrier tracking number entered.
➢ Quick Report - ![]() - Creates a printable/exportable report of the cases listed in your current Cases Query result.
- Creates a printable/exportable report of the cases listed in your current Cases Query result.
➢ Case History - ![]() - Opens a view showing Case details, Calls, and an Audit Trail associated with the selected case.
- Opens a view showing Case details, Calls, and an Audit Trail associated with the selected case.
➢ Case Evaluation - ![]() - Opens the Case Evaluations form for the selected case. This will show all questions and answers that the customer has responded to for the case. For more information please see to the Case Evaluation help page.
- Opens the Case Evaluations form for the selected case. This will show all questions and answers that the customer has responded to for the case. For more information please see to the Case Evaluation help page.
Please Note: The above options are available only when at least one case is found based on the search that was performed.
➢ Reset - ![]() - Clears out previously entered search criteria and search results.
- Clears out previously entered search criteria and search results.
➢ Close - ![]() - Closes Case Finder.
- Closes Case Finder.
•The bottom section includes several tabs of information related to the selected case such as:
See also:
How to add Enclosures to a case