Employees Maintenance |

|

|
|
Employees Maintenance |

|

|
Usage: In order to add a new employee to the database, please make sure that all necessary prerequisites have already been configured. These are:
➢QC Tasks Please make sure that the task which will be used is a QC task and is marked as such. This means that the task is a Quality Control task and has the QC Task option checked.
Navigation: Employees > Employees

Employees navigation form
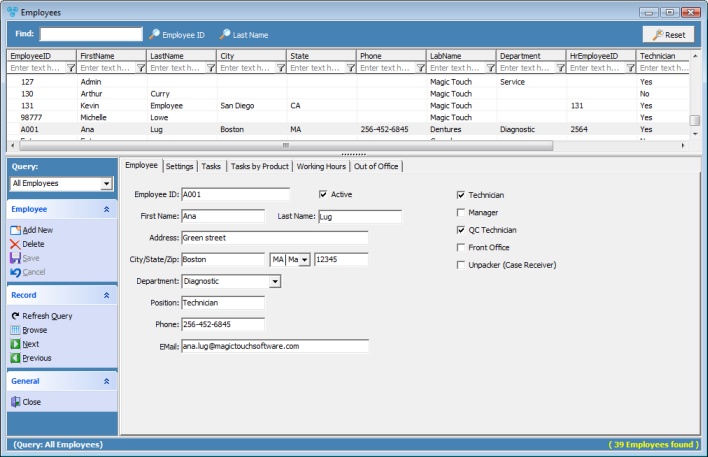
The following form will open:

Employees form
➢The Search section is displayed on the top of the form: •Enter the Employee ID or Last Name in the Find field and click on the Employee ID or Last Name button. The employee(s) which match the searched criteria will display in the grid.
➢ Left menu - available options: • Query - You can select an existing query from the drop down list. You can select to see Active Employees, All Employees Inactive Employees, Managers, or just Technicians. The resulting employees will display also in the grid. •Add New record, Delete record, Save record and Cancel record. •The Record section includes Refresh Query, Browse, Next and Previous records.
➢Employees details: •Clicking on any employee from the grid will display details on the screen. This section has following available tabs: |
1.Click Add New on the left column of the Employee form. 2.The first available tab is Employee. Fill in all necessary information about the new employee.
Employees form - Employee tab Please Note: The third tab called Tasks and the fourth tab called Tasks by Product are only available when the employee is specified as a Technician or QC Technician. 3.Select employee's position : Technician, Manager, QC Technician, Front Office, or Unpacker (Case Receiver). You may select more than one. 4.Click on the Settings tab.
Employees form - Settings tab 5.Enter the HR Employee ID and all other necessary information such as: Hire Date, Daily Hours, Lab Name, Password, DLCPM User, Start Time, Hourly Rate, Supervisor, Holiday Pay Hours and Birth Date. Please Note: The Termination Date and Termination Reason should only be entered at the appropriate times. After this information is entered, this employee will no longer be Active and will not be able to perform tasks in the application. 6.Click on the Tasks tab. Enter the tasks that this technician is allowed to perform. 7.Click on the Tasks by Product tab. This allows you to Add, Edit, or Delete a Pay Rate or Flat Rate for the technician's work on a specific task for a specific product. Any changes here will also reflect in File > Global Settings > Products and Tasks Lists > Production Tasks > Technicians tab. 8.Click on the Working Hours tab.
Employees form - Working Hours tab 9.You may enter the technician's working hours manually for each day of the week, or you can click on Use Lab Business Hours to use the lab hours entered in Global Settings. You can also click the Load Lab Business Hours button to populate the Global Settings hours, which can then be edited manually on the technician record. Please Note: Lab Business Hours can be set in File > Global Settings > Global > Laboratory Lists > Laboratories > Business Hours 10. Click the Out of Office tab. Click the Add button to enter any dates the technician will be off for vacation or any other reason. 11. When everything is done, click Save on the left column of the Employee form. |
1.Select the Employee from the grid that you wish to remove. 2.Click on 3.Click Yes when prompted for confirmation. The selected employee and all related data will be deleted from the database. Please Note: If an employee has any activity in CPM that has been logged, users will not be allowed to delete that employee record. The best way to handle that situation is to select the Employee from the grid, select the Employee tab, and de-select the Active checkbox in order to make the selected employee Inactive. |
|
See Also: