Estimate case |

|

|
|
Estimate case |

|

|
Usage:
An Estimate Case acts as an Invoiced Case so user may use the print invoice option. Once approved by Customer, it can be converted to a Normal Case using Convert Estimate menu.
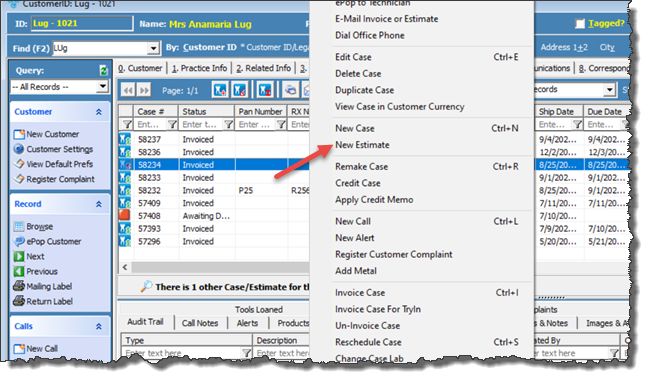
Navigation: Customer > 4.Cases tab > Right click in the grid > Select New Estimate

New Estimate
1.On the Cases form right click in the grid area. Several options will be displayed. 2.Click on New Estimate option. New Estimate form will be displayed.
New Estimate form The New Estimate form has several fields populated by default with data entered previously in different screens of the application. The Case form is divided in two main areas: •The upper area that includes four tabs: 1.General -> As it can be seen on the above screenshot this tab contains the basic information regarding the Customer, Patient, Doctor, Lab and Catalog. 2.Remake and Discount -> is the tab where Remake and Discount values are introduced if they are offered. 3.Follow-Up Call -> New Call can be created right after the case is saved and if data is filled in in this section. 4.Invoice and Totals -> Displays several fields with different amounts. •The lower area with the following tabs, the Action button, and the Save and Cancel buttons. 1.Products -> On this tab the Products are added. (see this topic for details of How to add products to a case). 2.Enclosures -> On this tab the Enclosures are added. (see this topic for details of How to add enclosures to a case). 3.Images and Attachments -> If any attachment is added to a case it can be viewed on this tab. Note: Images can be added to a case only after the case was created, so at this point this tab will be always empty. 4.Materials -> On this tab the Materials are added. (see this topic for details of How to add materials to a case). 5.Call and Notes (available only after the estimate case was saved and it opened for editing)-> If any Calls related to this case exist, they can be viewed on this tab. If this case was just created this page will be empty until a call is added. 6.Schedule (available only after the estimate case was saved and it opened for editing) -> Allows managing the tasks that are required for product creation once the case has been saved and the schedule has generated based on the products entered on the case. 7.Actions button -> This option displays several menus along with their shortcut keys. For example Ctrl+P prints the Invoice and Ctrl+W prints the Work Order. You do not have to close the Case to perform these functions.
3.Without entering any other information you can click on the
How to add data like Products or Enclosures, or how to Remake, add Discounts , as well as all other operations that can be done using cases is detailed on different topics. See more details in Create new Case topic
Clicking on New cases that are created gets a number assigned and also the default status that is set in Settings > Case options |
See also: