Accounting Collection Calls Manager |

|

|
|
Accounting Collection Calls Manager |

|

|
Usage:
The Accounting Collection Calls Manager menu is designed to keep track of all calls generated in the Accounting Collection Calls menu.
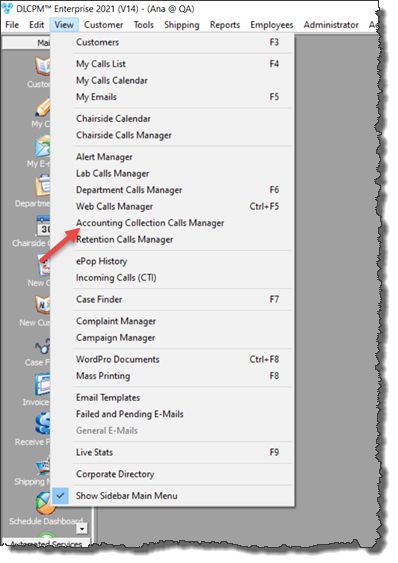
Navigation: View > Accounting Collection Calls Manager

Accounting Collection Calls Manager navigation
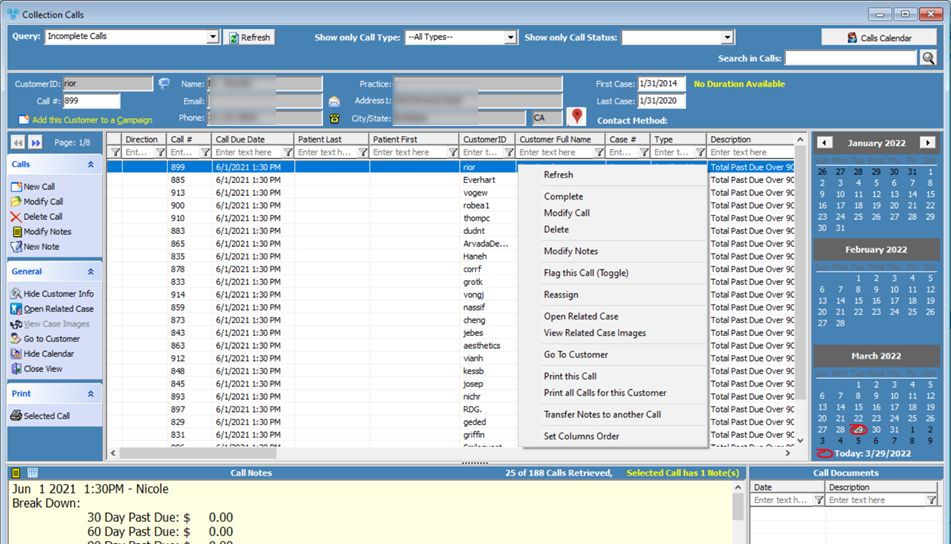
The following form will open:

Accounting Collection Calls Manager form
The Accounting Collection Calls Manager form is divided into several rows and columns which display different types of information.
➢ Grid section - In the middle of the form is the grid where the calls are displayed and details of each call can be viewed in different columns.
➢ Query section - These several fields allow users to search between all existing calls: •Query - You may select an existing query from the drop down list. Some examples of the queries available are All Calls, Incomplete Calls, Complete Calls, Flagged Calls and All Calls newer than 90 days. •Show only Call Type - Select from the drop down list to filter by call type. •Show only Call Status - Select from the drop down list to filter by call status. •Search in Calls - Type a keyword to search for corresponding calls. •Calls Calendar - Open a calendar style view of calls. Please Note: All of these options can be combined in order to filter the calls and to view the particular calls you are interested in.
➢Customer section - All fields in this section are for display only and are intended to provide information about the customer who the call was created for. Selecting any call in the grid will provide information about: •Customer Details - Displays Customer ID, Call #, Name, Email, Phone, Practice Name, Address, dates of First and Last Case, and Contact Method of the customer corresponding to the selected call. This section also provides the following functions: ❑ ❑ ❑ • You can add the customer to an existing campaign by clicking on the
➢ Accounting Collection Calls Manager menu - Available options include: •The Left and Right Arrows and the Page Counter. •New, Modify and Delete calls in the Calls menu. •General menu has: •Left and Right arrows to navigate between pages. •Calls menu: New Appointment, Modify Call, Delete Call, Modify Notes, New Note, Memorize Call, View Memorized Calls. •General menu: - Hide/Show the Customer Info - Open Related Case - If the selected call is linked to a case, this button will open that corresponding case. - View Cases Images - Displays the images attached to the case linked to the selected call. For more details please read this topic. - Go to Customer - Opens the customer form belonging to the customer linked to the selected call. - Hide / Show Calendar - Enables or disables the calendar displayed on the right side of the form. - Close View - Closes the Accounting Collection Calls Manager form. •Print Selected Call - Prints the details of the selected call.
➢ Calendar - Displayed on the right side of the form. The current day is displayed by default and is marked with a red circle. The calendar can be closed by clicking on the Hide Calendar option under the General menu.
➢ Call Notes - Call notes are displayed on the bottom of the form. All notes that were added to the selected call are displayed in chronological order. Two display options are available for call notes. You can view a call note as: •Text - if you click on •Grid - if you select
➢ Call Documents - Displays documents corresponding to the selected call.
➢ Right-click on the call grid to access the following options: •Refresh •Complete •Modify Notes •Flag this Call (Toggle) •Reassign •View Related Case Image •Go to Customer •Print this Call •Print All Calls for this Customer •Transfer Notes to Another Call •Set Columns Order |
![]() How do I post a payment while on the phone with a Customer?
How do I post a payment while on the phone with a Customer?
1.On the Accounting Collection Calls Manager form, select the Call that is assigned to the Customer you are talking to. 2.Click on the Go to Customer button from the General menu. 3.On the Customer record, go to the 5. Accounting tab. 4.Click the 'Post Payment' button. 5.The Post Payment module will open. Enter the required information and click one of the 'Process' buttons to post the payment. Please Note: After the payment has been processed, depending on the method of payment used, you will receive a Transaction ID and Authorization Code that you can provide to the customer. If the Customer has a valid Email Address, an Email notification will be sent automatically with the Transaction ID, Authorization Code and the amount charged (This Email notification will only be sent out if the option marked Send confirmation email for CC Payments is checked prior to the completion of the transaction).
Tips: ·If Customer has a CC on file, you can select it by checking the box “Use Credit Card on File”. ·Depending on your Security Settings, users may or may not be able to view the full CC number when viewed in the Customer Settings module. For security reasons, only part of the CC numbers are displayed for each payment. ·If a Customer consents to keeping their CC number on file for future use, you may check the box for “Save Card on File” when posting the payment. The CC information is encrypted and follows Visa & MC guidelines. |
See also: