Volume Discount |

|

|
|
Volume Discount |

|

|
Usage:
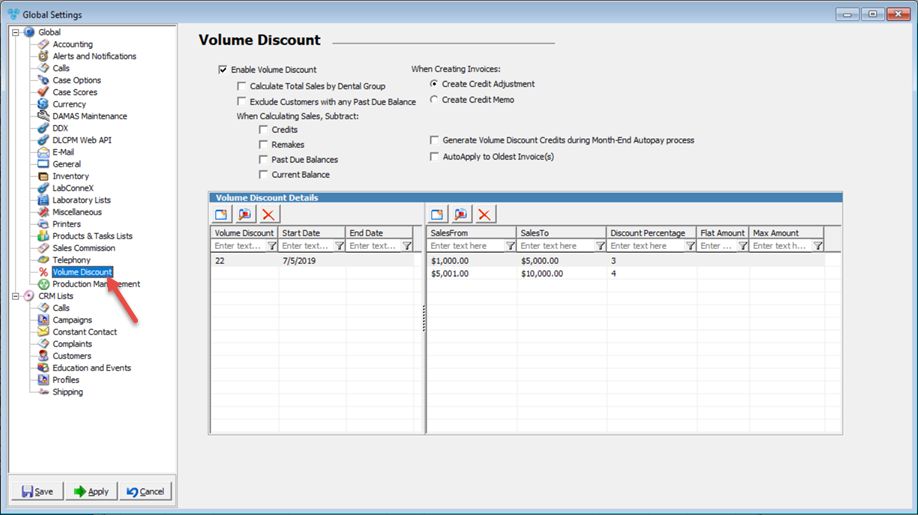
This option provides a method to automatically create Credit Memo or Credit Adjustment with option to preview. The process is fully automated and takes place when creating statements.The Volume Discount will not apply to the customer until this option is enabled.
Navigation: File > Global Settings > Global > Volume Discount
Note: If you are unable to see this option, you would need to add it to your user under the application policy.

Volume Discount menu
Set up Volume Discount:
1.Enable Volume Discount option and the you may:
➢Determine how the sales are calculated:
•Calculate Total Sales by Dental Group - this option will look at the Dental Group which the Customer is assigned to. It will then take the sum of the sales for the entire group to calculate the discount.
•Exclude Customers with any Past Due Balance - if selected, then this option will exclude customers with past due balance.
•When Calculating Sales, Subtract: Credits, Remakes, Past Due Balance or Current Balance. If you decide to subtract credits, remakes, and past due balances from the total sales, check the respective checkboxes. You can subtract all, none, or any.
•When Creating Invoices you can either Create Credit Adjustment or Create Credit Memo. Determine if you would like to create a credit memo which requires a product to be selected or simply create a credit adjustment. Please note that credit memos are always included in all sales and credit reports whereas credit adjustments are for accounting purposes and will never be included in the sales and credit reports.
•Generate Volume Discount Credits during Month-End Autopay process - if this option is checked, then the discounts are posted before customers are charged.
Please note: This option only applies to customers set up for Month-end autopay frequency.
•AutoApply to Oldest Invoice(s)
Once the Volume Discount is enabled you have access to the Volume Discount Details. Volume Discount Details will allow you to create as many volume discounts as you like and each can have their own matrix.
1.Click on 2.Enter Volume Discount on Add Volume Discount form 3.Enter date range for the Volume Discounts. If the start or end dates are left blank, the date range is not enforced. 4.Click 5.Volume Discount is created. You need to enter details. |
1.Select the Volume Discount. You need to add it first 2.Click on 3.Make changes. 4.Click 5.Volume Discount is updated. |
1.Select the Volume Discount. You need to add it first. 2.Click on 3.Select Yes when asked for confirmation. 4.Volume Discount is removed. |
1.Select the Volume Discount in left panel. You need to add it first. 2.Click on 3.Add Volume Discount Detail form displays. 4.Enter Sales Range from and To. 5.When Calculating the Volume Discount, Apply: •Percentage with a maximum dollar amount set in Do not exceed this amount or •Flat Amount 6.Click 7.Volume Discount details are entered. You can repeat these steps to add multiple range and multiple discount percentage as necessary. |
1.Select the Volume Discount in left panel. You need to add it first. 2.Click on the Volume Discount Detail you want to update. 3.Click on 4.Edit Volume Discount Detail form displays. 5.Enter Sales from, Sales to and Discount %. 6.Click 7.Volume Discount details are changed. |
![]() Delete Volume Discount Details
Delete Volume Discount Details
1.Select the Volume Discount in left panel. You need to add it first. 2.Click on the Volume Discount Detail you want to remove. 3.Click on 4.Select Yes when asked for confirmation. 5.Volume Discount details is removed. |
Click Apply on settings form if you would like these changes to take immediate effect or click OK to save and close the Settings form.
See also: