QC Ratings |

|

|
|
QC Ratings |

|

|
Usage:
QC Ratings displays the quality control for the cases.
Prerequisites:
Please make sure you have data entered in following tables before going further:
•QC Ratings that will be available if case is accepted: File > Global Settings > Global > Laboratory Lists > QC Ratings
•Reasons set for QC that will be necessary if case will be rejected: File > Global Settings > Globalobal > Laboratory Lists > Reasons
•Laboratory where case will be sent if will be rejected: File > Global Settings > Global > Laboratory lists > Laboratories
•Valid Case Number that will be rated. See How to create a case for more details.
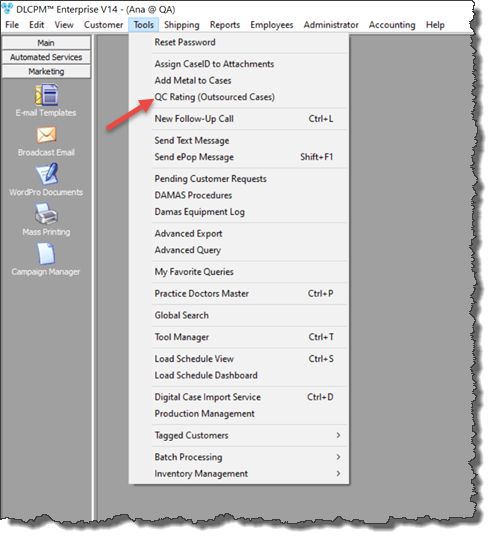
Navigation: Tools > QC Ratings (Outsourced Cases)

QC Ratings navigation
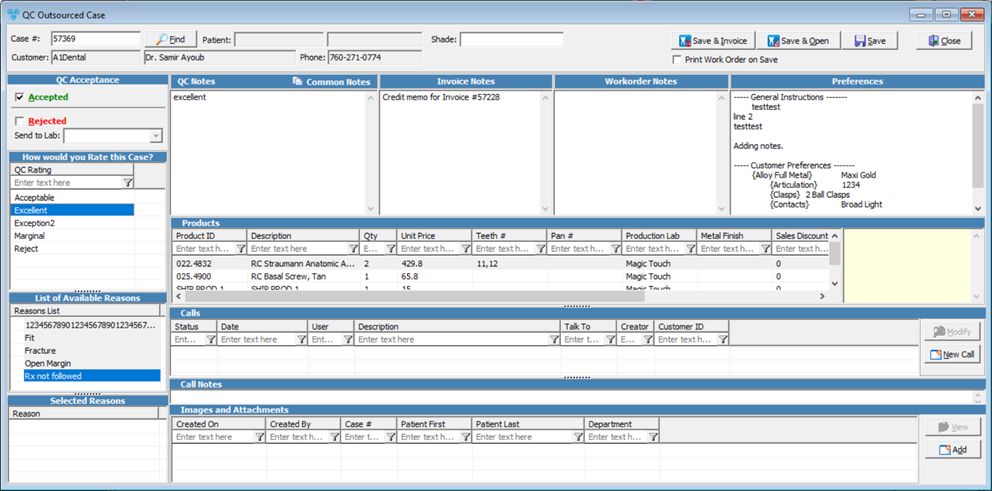
Following form will open:

QC Outsourced Case form
1.On QC Outsourced Case form enter the Case Number 2.Click enter or 3.Check 4.Select a QC rating from the available list under the "How would you Rate this case?" section. 5.You can enter QC Notes 6.Click To view the Qc ratings navigate to Customer > Cases > select the case and click on QC Ratings tab.
Note: Before saving you can: ➢Print WorkOrder on Save- check this option if you need to print workorder when saving the record. ➢Add a new Call •Click •Follow the steps from this topic excepting the navigation part ➢Modify an existing call •Click on a call in the grid •Click on •Make necessary changes •Click ➢Add Images and Attachment •Click •Add Photos and Attachments form opens •Enter Description and Department if necessary •Select what to enter: oRepository and select the Files you want to add by clicking on the oor Web Link and enter URL •Enter Notes Note: CustomerID, Case number and Patient Name cannot be changed during an image attachment. •Click ➢View Existing Images and Attachments •Select the file name in the grid by clicking on it •Click on •The attached image will be displayed on the screen |
1.On QC Outsourced Case form enter the Case Number 2.Click enter or 3.Check 4.You can select a Lab to return the case to from the available ones in the dropdown. 5.Select a Reason from the available list under the "List of available Reasons" section. 6.Selected Reasons are displayed on the next section. To unselect you can double click on them or right click and select Remove Reason. You can also clear the entire list by right clicking and selecting Clear selected reason list option 7.You can enter QC Notes 8.Click To view the Qc ratings navigate to Customer > Cases > select the case and click on QC Ratings tab.
Note: Before saving you can: ➢Print WorkOrder on Save- check this option if you need to print workorder when saving the record. ➢Add a new Call •Click •Follow the steps from this topic excepting the navigation part ➢Modify an existing call •Click on a call in the grid •Click on •Make necessary changes •Click ➢Add Images and Attachment •Click •Add Photos and Attachments form opens •Enter Description and Department if necessary •Select what to enter: oRepository and select the Files you want to add by clicking on the oor Web Link and enter URL •Enter Notes Note: CustomerID, Case number and Patient Name cannot be changed during an image attachment. •Click ➢View Existing Images and Attachments •Select the file name in the grid by clicking on it •Click on •The attached image will be displayed on the screen |
See also: