Customer Taxes Settings |

|

|
|
Customer Taxes Settings |

|

|
Usage:
Set Customer taxes on this tab. You can add one or multiple taxes. You can also leave the grid without any record if there is no tax to be applied.
Note: Each of these settings will effect ONLY the selected customer. The Customer Settings form is not available unless a customer is previously selected.
Prerequisites:
In order to be able to add taxes, please make sure you have data entered in following table:
•Tax -> Path: File > Global Settings > Global > Laboratory Lists > Tax Rates
•Tax Groups-> Path: File > Global Settings > Global > Laboratory Lists > Tax Groups
•Medical Excise Tax -> Path: File > Global Settings > Global > Laboratory Lists > Medical Excise Tax
Navigation: Customer > Settings > Taxes

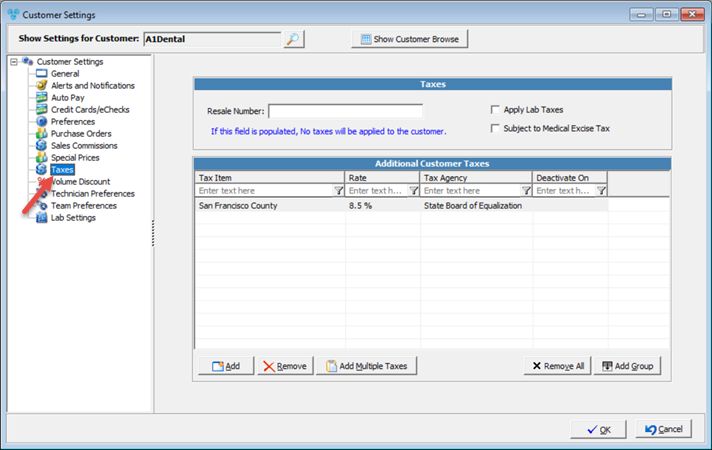
Customer Settings - Taxes menu
Available options:
➢Apply Lab Taxes - select if you wish to apply the taxes set for the lab that is used by the customer.
➢Subject to Medical Excise Tax - In order to make this customer subject to Medical Excise Tax, this checkbox option must be enabled. If this option is not enabled, regardless of the product and Global Settings, the Medical Excise Device Tax will not generate for this customer's invoices.
➢The Resale number field has been added to track this data if the customer is tax exempt.
➢Additional Customer Taxes will have a great effect on how the final cost of the case products will be calculated. This tax amount will be applied to all products that are Taxable. To set the Taxable option for a product you have to navigate to the Products form, select the product or product(s) and mark as taxable.
➢Add single Tax Item: 1.Click 2.Select the Tax Item from the drop down list. 3.Click OK to save the record. ➢Add Multiple Taxes at once: 1.Click 2.All taxes are displayed on the left side and already added taxes are on the right. 3.Select the Tax Item from the list and click on the arrow to move it to Add Taxes. 4.Click OK to save the record. ➢Add All Taxes 1.Click 2.Select Yes when asked for confirmation. ➢Add Group 1.Click 2.Select the Tax Group from the drop down list. 3.Click OK to save the record |
➢Remove single Tax Item: 1.Select the Tax Item you wish to remove by clicking on it. 2.Click 3.Select YES when prompted for confirmation. ➢Remove All Taxes 1.Click 2.Select Yes when asked for confirmation. Note: The record will be deleted from the database, but you may add it back at any time. |
Click OK on the Settings form for any changes to take effect.
See also: