Settings |

|

|
|
Settings |

|

|
Usage:
Change project settings from here.
Please Note: This Module can be accessed ONLY by administrator. User and password are required to access this form.
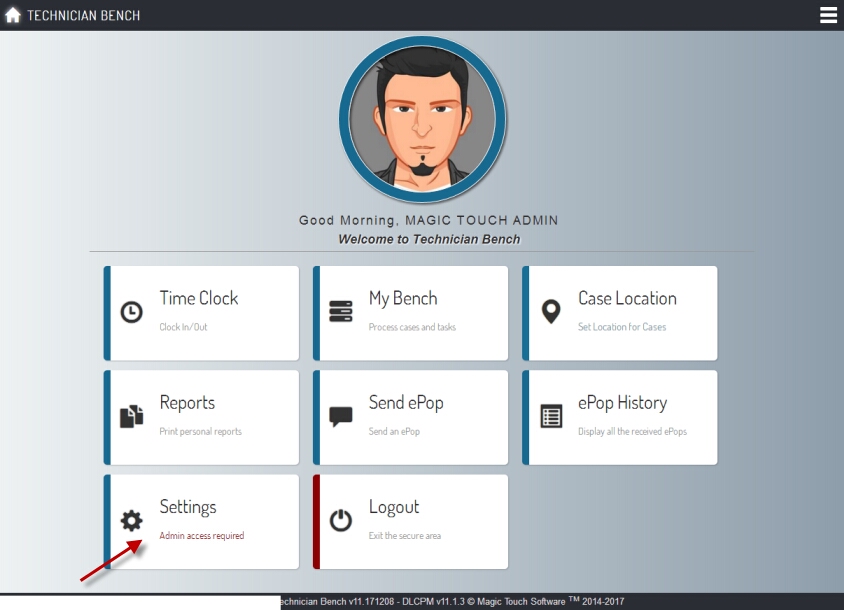
Navigation: Once logged into the application click on Settings Module

Settings navigation
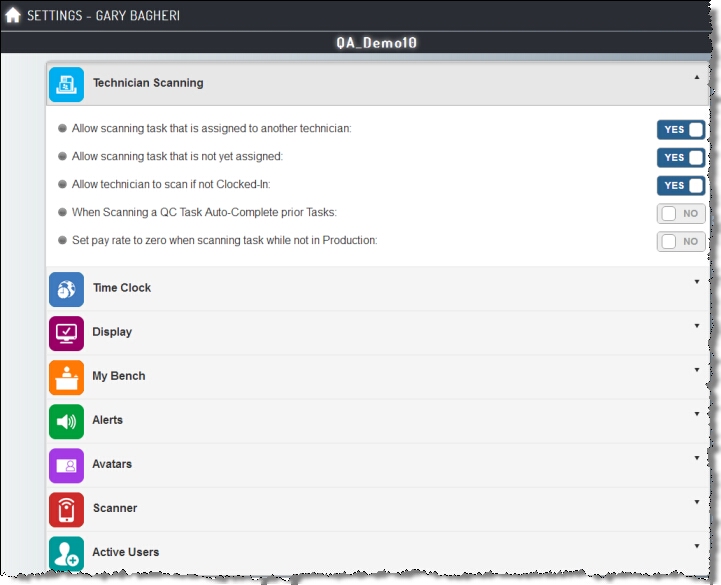
Following form will be displayed:

Settings form
•Allow scanning task that is assigned to another technician - if YES then tasks assigned to other technicians will be displayed in My Bench, however you still cannot Process Tasks assigned to others. •Allow scanning task that is not yet assigned - if YES then tasks that are not assigned will be displayed in My Bench. •Allow technician to scan if not Clocked-In - if YES then technician can scan cases and process tasks in My Bench. Otherwise Processing cannot be performed. •When Scanning a QC Task Auto-Complete prior Tasks - if YES then all tasks before a QC task will be automatically processed when a QC Task is processed. •Set pay rate to zero when scanning task while not in Production - If YES then pay rate will be set to 0 for all tasks processed while clocked in for non production. |
•When clocking out, do not show Lunch - if YES then Clock out for Lunch option will not be available. •When clocking out, do not show Break - if YES then Clock out for Break option will not be available. •When clocking in for non-production, expect Notes - if YES then when Clock In for Non production is selected, notes are required. •Use third party time clock software - if Yes then the Time Clock module will not be available. The message: "Technician Manager Time Clock has been disabled by the Administrator." will be displayed in main menu. |
•Extend header to show Laboratory Name - If YES the Laboratory name will be displayed in header. |
•Scan by Case Number - If YES then Case Number search option is selected by default. Otherwise Pan Number is the default in My Bench Module. •Allow technician to post case comments - If YES then Technician can post comments in Notes section. •Auto select ePop when posting case comments - If YES then Technician can send ePop comments in Notes section. •Auto extend Lot Number area - If YES then Lot Number is extended, with save and clear options available. Otherwise you add the lot number directly in the grid. •Configure My Bench Layout - Setup Advanced Screen Layout: The display resolution and device orientation may impact these values. Please experiment with different options to find the optimal setting. The columns will be arranged and sized according to the selected configuration. ➢ Set Ultra to show only on desktop monitors or high resolution tablets ➢ Set Large to show starting with medium to large resolution displays (7" landscape mode or 8" portrait mode) ➢ Set Medium to show starting with medium resolution displays (7" portrait mode or even 5" landscape mode). ➢ Set Small to show on all screen sizes |
•Beep to confirm the bar code scan result - if Yes then a sound will be made each time after scanning. |
•To Setup an avatar image for an Employee, you need to create an image with the max size of Width: 210 and Height: 210 pixels. The image name should be formatted like <employeeID>.jpg where <employeeID> is the actual ID of this employee. The image location is a sub-folder within the TechnicianBench folder named: /images_employees/ Example: For employeeID 100, the avatar image name should be 100.jpg. |
•Setup Scanner - This option is only available with supported devices such as Smart Phone and Tablets. |
•Displays number of Active Users, Number of Licenses Installed and Employee details such as ID, Full Name and Create Date |