Job Management |

|

|
|
Job Management |

|

|
Usage:
The Job Management tool is designed to allow users to automate the most common reports to be generated regularly. This option will produce any specified reports automatically and deliver them without any user interaction.
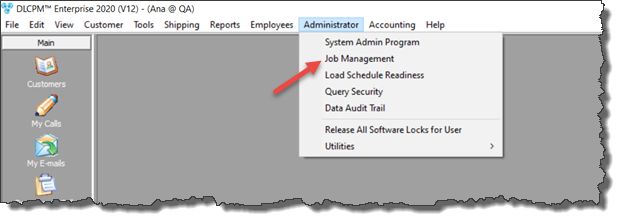
Navigation: Administrator > Job Management (You can also reach this form by navigating to Automated Services from the Side Bar menu, and then clicking Job Management)

Job Management
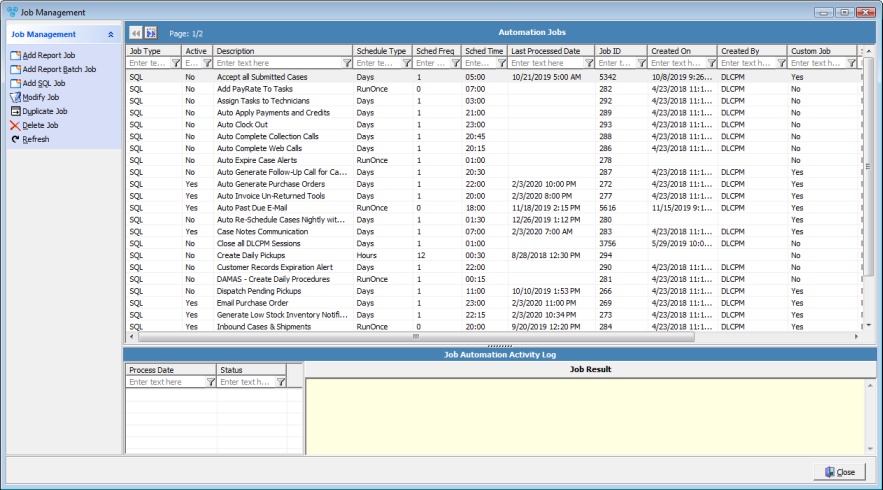
The following form will open:

Job Management form
1.On the Job Management form, click Add Report Job to open the following form.
Add Automation Server Report job form 2.Enter a Job Description - This is where you will name the report. 3.Check This Job is Active if this is the case. 4.On the Report tab, the following fields are available: ➢Report Name - Click on Pick Report to select from one of the available reports. ➢Set Parameters - Depending on the report, several parameters are available to set. Click on Set Parameters button and enter the desired values. ➢Report Parameters - Once the report is selected, the required parameters will display. Double click on the Value field for each parameter in order to set the value.
Select variables Please Note: If the parameter is static like Lab Name, simply enter it, i.e. Lab or All. If the parameter is a date, click on the Variable drop down to set the relative date.
Please Note: You may add or subtract from the variables to specify if the report should run for the previous, day, month, etc. For example: • - 1 = minus one day •- W1 = minus one week •- M1 = minus one month •- Y1 = minus one year •+ W2 = plus two weeks •- 10 = minus ten days Examples of this using the date variables: •YEAR_START - Y1 = first day of the previous year •MONTH_END - 1 = second to last day of the current month
➢Report Delivery Method - There are 4 different delivery methods: •Save as File - Save the report into a repository as a separate file. The supported file formats are PDF, Excel, MS Document and CSV. •E-mail - This option will email the report. Provide the Email address and the file format. •Print - This option will print the report. Select one of the available network printers. •FTP - This option will transfer the report to an FTP Server in the specified format. 5.On the Schedule tab, specify how often this report should run.
Schedule tab The options are: ➢Run only Once. ➢Run every X Minutes, Hours, Days. ➢Run every Week on the selected day. ➢Run every Month on the selected day. ➢Enter the start time in Start Job on field. Optionally, define the date that you want the job to start on as well.
6.Set the number of Days in Discard Job Log after field to define how long job logs should be stored. 7.Click OK to save the report. After the report has been saved, you may right click on the job to run it now. |
1.On the Job Management form click on Add Report Batch Job and the following form will open.
Add Automation Server Report Batch Job form 2.Enter Job Description - This is where you will name the report. You may want to choose a descriptive name so it will be easier to recognize the report job. 3.Check This Job is Active if this is the case. 4.On the Report tab the following fields are available or populated: ➢Report Name - Click on Pick Report to select from one of the available reports. ➢Set Parameters - Depending on the report several parameters are available to be set for a more accurate report. Click on Set Parameters and enter the values. ➢Reports Parameters - Once the report is selected, the required parameters will display. Double click on the Value field for each parameter in order to set the value.
Select variables Please Note: If the parameter is static like Lab Name, simply enter it, i.e. Lab or All. If the parameter is a date, click on the Variable drop down to set the relative date.
Please Note: You may add or subtract from the variables to specify if the report should run for the previous, day, month, etc. For example: • - 1 = minus one day •- W1 = minus one week •- M1 = minus one month •- Y1 = minus one year •+ W2 = plus two weeks •- 10 = minus ten days Examples of this using the date variables: •YEAR_START - Y1 = first day of the previous year •MONTH_END - 1 = second to last day of the current month
➢Email the Report to Customer using: •Email Template - select the template from the dropdown. •Customer Query - select the query from the dropdown. •Send Email using - select either Main Account or Billing Contact email. •Email Procedure 5.On the Schedule tab, specify how often this report should run.
Schedule tab 6.The options are: ➢Run only Once. ➢Run every X Minutes, Hours, Days. ➢Run every Week on the selected day. ➢Run every Month on the selected day. ➢Enter the start time in Start Job on field. Optionally, define the date that you want the job to start on as well.
7.Set the number of Days in Discard Job Log after field to define how long job logs should be stored. 8.Click OK to save the report. After the report has been saved, you may right click on the job to run it now. |
1.Select the Job you want to Duplicate. 2.Click on Duplicate Job. 3.The Duplicate Job Form will open.
Duplicate Job form 4.The Job Description is automatically populated with "Copy of [original job name]" but you may enter a new name for clarity. 5.Click 6.The duplicate job will be created. |
See also: