|
Doctor Supply Fulfillment Management |

|

|
|
|
Doctor Supply Fulfillment Management |

|

|
Doctor Supply Fulfillment Management
Usage:
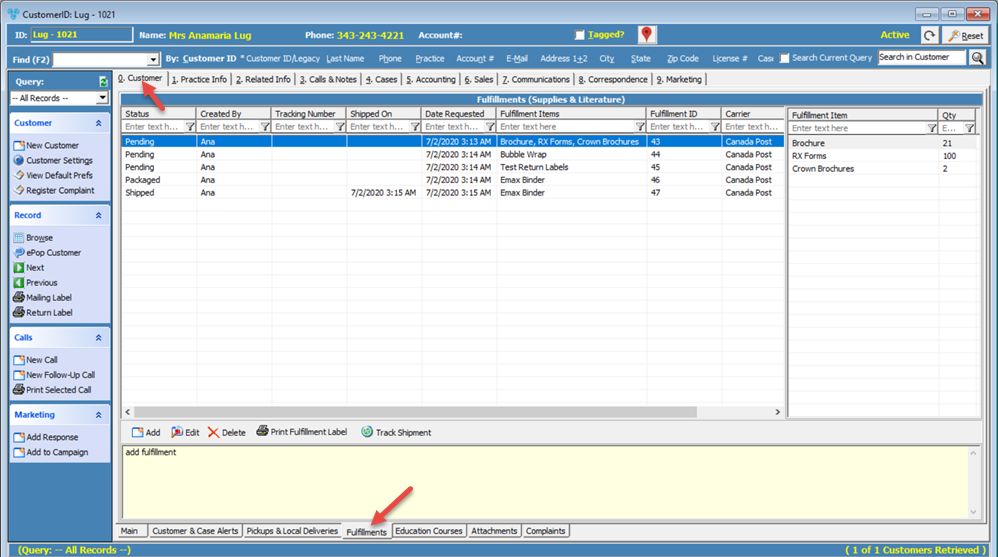
DLCPM eliminates guessing how to fulfill your doctors’ supply requests. All requests are viewable in one central area for your staff to process, where the rest of your customer service team can instantly know whether a request has been processed or if it is still pending.
Prerequisites:
Before adding any Fulfillment Items to the customer record, please make sure that the items you wish to enter are already added to the database.
➢Fulfillments Items -> Path: File > Global Settings > CRM Lists > Shipping > Fulfillment Items
➢Carriers -> Path: File > Global Settings > CRM Lists > Shipping > Carriers
Navigation: Customers > 0. Customer tab > Fulfillments tab

Fulfillments form
1.On the Fulfillments form, click on the
Add Fulfillment form 2.Status and Date Requested are automatically populated with the appropriate information, however these fields can be changed if necessary. 3.Carrier and Tracking Number can be entered only if the fulfillment is shipped (Status set to Complete). 4.Update Starter Kit Date when Shipped will be checked automatically if at least one of the added fulfillment items has this option checked in the Settings. It can also be manually selected. As a result, the Starter Kit date will be set to today's date once the fulfillment is shipped. 5.Select the Shipping Lab. 6.To add a new Fulfillment Item click 7.The Add Fulfillment Item form will open. 8.Make a selection from the Description drop down field, enter the Quantity, and click 9.You can add as many items as you wish by repeating the previous three steps. 10. Notes can be entered at the bottom. 11. To modify an added record click on the record you wish to change and then click on the 12. To delete an added record select the record and click on the 13. Click Save and Close to finalize the Fulfillment adding process. |
Once a Fulfillment record is created it can be edited, deleted, or shipped. 1.To update an existing record click on it and then click the 2.You may change Fulfillment Information and/or make updates to Fulfillment Items. 3.To add a new Fulfillment Item click 4.The Add Fulfillment Item form will open. 5.Make a selection from the Description drop down field, enter the Quantity, and click 6.You can add as many items as you wish by repeating the previous three steps. 7.Notes can be entered at the bottom. 8.To modify an added record click on the record you wish to change and then click on the 9.To delete an added record select the record and click on the 10.Click Save and Close to finalize the Fulfillment editing process. Please Note: You can set the Fulfillment status to Completed. In the example shown above, the Status changed to Shipped and the Tracking Number field enabled. |
1.On the Fulfillments form, select the Fulfillment you wish to ship. 2.Click on the 3.On the Edit Fulfillment form check the Mark as Shipped box. The status is automatically changed to Shipped. 4.Enter Carrier and Tracking Number. 5.Click Save. The Tracking Number and Shipped Date are populated in the grid. Also, the Status will show that this record was Shipped. |
1.On the Fulfillments form, select the Fulfillment you wish to delete. 2.Click the 3.Select YES when prompted for confirmation. Please Note: The record will be deleted from the database, but you may add it back at any time. |
1.On the Fulfillments form, click on the Fulfillment whose label you want to print. 2.Click on the Note: You can also print the label later by using Print Fulfillment Label menu. |
1.On the Fulfillments form, click on the Fulfillment you want to track. 2.Click on the |
See also: