Settings |

|

|
|
Settings |

|

|
There are several options that can be selected depending on the laboratory profile.

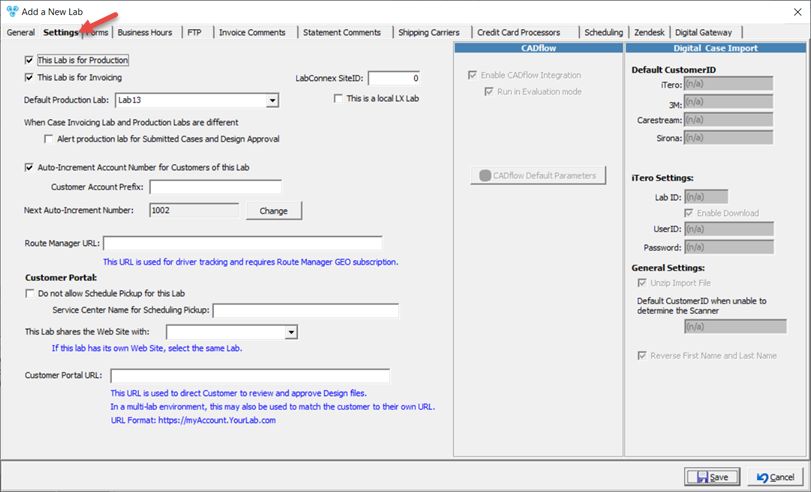
Laboratory form - Settings tab
➢You can choose if the entered laboratory is for production or for invoicing. Just check the relevant option: This Lab is for Production or This Lab is for Invoicing. You can also check both options if the created laboratory has both services. Or if the laboratory does not meet these specifications, you can leave the boxes unchecked.
➢Select the Default Production lab. This option is available only if the selected lab is for Invoicing.
Note: If there is no available Lab name in Default Production Lab, you need to add a new Laboratory that has : This Lab is for Production option checked. Only Labs with this setting are displayed in the Default Production Lab field.
Note: Even though the Lab is set for both Production and Invoicing you still need to add the default production lab because there can be situations where the selected lab uses another lab for production.
➢When Case Invoicing Lab and Production Labs are different you have the option to Alert Production Lab for Submitted Cases and Design Approval
➢Auto increment Account Number for Customer of this Lab. If enabled then fill in the Customer Account Prefix.
➢Next Auto Increment Number is populated by default once the previous option is checked.
If you want to change this number:
•Click ![]()
•Enter new Next Auto-Inc Number
•Click OK
➢Customer Portal
•Do not allow Schedule Pickup for this Lab - pickups will not be allowed to be scheduled if this option is selected
•Enter Service Center Name for Scheduling Pickup
•This Lab shares the Web Site with: - select the web site. If the entered lab has its own Web Site, please select the same Lab.
•Add Customer Portal URL - This is used to direct the Customers to review and approve the Design files
Single Lab: https://myAccount.YourLab.com
Multi Lab: https://myAccount.YourLab.com/?Lab=
➢Enter LabConnex SiteID
➢Check This is a Local LX Lab if this is the case.
See also: