Customer Auto Pay Settings |

|

|
|
Customer Auto Pay Settings |

|

|
Usage:
Payments can be processed manually or automatically. If you would like payments to be processed automatically at the date that you decide, navigate to the third menu of the Customer Settings form, called Auto Pay. On this form you will able to configure specifically how the automatic payment system will work for the selected customer.
Note: Each of these settings will effect ONLY the selected customer. The Customer Settings form is not available unless a customer is previously selected.
Prerequisites:
In order to be able to set values in all available fields, please make sure you have data entered in following tables:
•Credit Card -> Path: Customer > Settings > Credit Cards
Navigation: Customer > Settings > Auto Pay

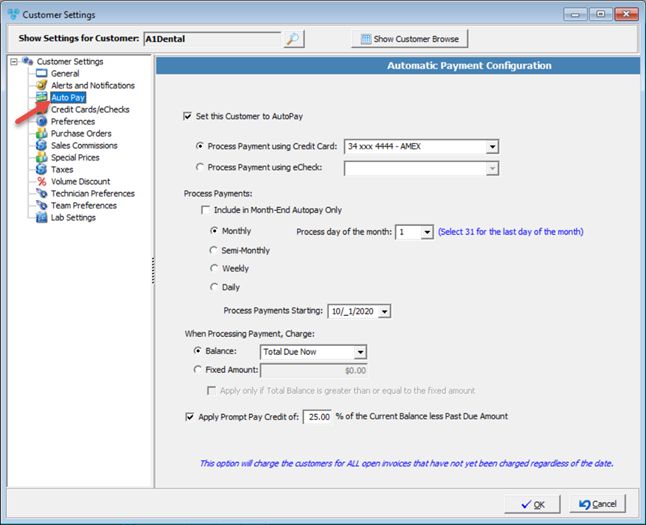
Customer Settings - Auto Pay menu
Available options:
Check Set this Customer to Auto Pay option. This option will enable auto pay and a specified amount of money will be automatically charged from the customer's credit card. You will need to enter additional information in following fields:
➢Process Payment using Credit Card- This field will automatically populate with the default credit card entered on the Credit Cards form. However, if you want to enter a different credit card, you can select a different card from the drop down list. If the credit card you want to enter is not on the list you will need to enter it first on the Credit Card form.
➢Process Payment using eCheck - If eCheck is supported for selected Merchant, eCheck will be available to set up similar to credit card. In Auto-Pay, user may set up eCheck for Auto-Pay if Merchant is supported.
➢Process Payments - You may Include in Month-End Autopay Only - When Month - End Autopay is selected the process frequency is no longer available. Before creating statements, the special Month-End Autopay shoul be performed. This option will process the payments for the selected customers. If this option is not selected you may select one from the following options of processing payments:
•Monthly - With this option you will also need to enter the Process day of the month. This day will be the day when the payments will be processed automatically every month.
•Semi-Monthly - This option means that the payments will be processed twice a month. If you select this option you will also see the message that: Payments will run on the 1st and 16th of each month.
•Weekly - This option will allow you to select a Process day of the week for when the payment will be automatically processed.
•Daily - If this option is selected then automatic payments will be processed every day at the same hour.
➢Process Payments Starting- Select the start date from the calendar to specify when auto pay will start.
➢After you have established when the payments are to be processed you will need to set up the amount that will be charged When Processing Payment. You can choose between a type of Balance from the drop down list or manually type a Fixed Amount.
• If the Fixed Amount is selected, there is a check box option, Apply only if Total Balance is greater than or equal to the fixed amount - When this option is activated, the fixed amount set for Autopay will not run if the customer's total balance is less than the fixed amount.
Note: Selecting Fixed Amount will continue to charge the customer regardless of their balance.
➢The last option is Apply Prompt Pay Credit of...% of the Current Balance less Past Due Amount. This option is if you would like to give this particular customer a discount for paying promptly.
Click OK on the settings form for any changes to take effect.
See also: