Usage:
First of all, you will need to have at least one email template in order to be able to use it. To create email templates check How to create email Templates topic. Once you have the desired template ready you can send emails using it.
Navigation: Customer > Communication

Communication
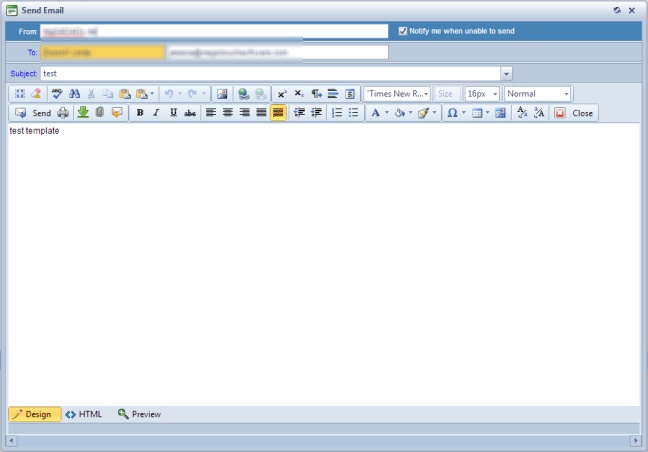
1. Open the desired folder and select the desired Template by clicking on it 2. Click on  button. This option will open the email editor. button. This option will open the email editor. 
Email editor
3.TO address field is already populated with customers email address. 4.You may edit the email and add attachments before sending. Note: The original template is not altered by changes made here
5.Once you are ready, click Send.
The following options are also available on Send E-mail form :

First row from left to right
➢Select all ➢Clear all content ➢Spell checker ➢Find and Replace ➢Cut ➢Copy ➢Paste ➢Paste options ➢Undo ➢Redo ➢Image Manager ➢Hyperlink Manager ➢Remove link ➢Super Script ➢Sub Script ➢New Paragraph ➢Horizontal Rule ➢Insert Date ➢Paragraph Style ➢Font Name ➢Real Font Size |
Second row from left to right
➢Send Email - By clicking on this button the email that was written is sent to it's destination. ➢Print - If you want to print the email click on this button. ➢Add merge fields - Click on “Add Merge Field” to select from any available fields. The mail merge is a very useful feature allowing you to personalize the email as opposed to a generic email. For example, instead of saying “Dear Doctor,” you can insert a merge field which looks like “Dear <<?Customers.CustomerFullName?>>,”. When email is sent, the merge field is automatically changed to the respective Customer name. Please note that your email will not look professional if the merged field is blank ➢Add Attachment - You can send attachments by simply clicking on this button and attach the documents. ➢Send Test - When sending broadcast email, it is always a good idea to send a test email to make sure it looks the way you had intended. You may also find and remove some words that cause the email to be trapped by junk mail filter. ➢Bold ➢Italic ➢Underline ➢Strike through ➢Align left ➢Align center ➢Align right ➢Remove Alignment ➢Indent ➢Outdent ➢Numbered list ➢Bullet list ➢Foreground color ➢Background color ➢Format stripper ➢Insert symbol ➢Insert table ➢Image map editor ➢Convert to lower case ➢Convert to upper case ➢Close |
Preview - If you like to see how the email looks like before sending, click on Preview button. You must click Design to return to the template editor.
|
See also:
How to create an E-mail Template
Customers for more available options
Customer Tabs for details of how to use the available menu


