Word Processing |

|

|
|
Word Processing |

|

|
Usage:
In addition to Microsoft Word, DLCPM also has its own built-in Word Processor. The built-in Word Processor is several times faster, has all of the standard formatting features however does not allow inserting tables or images. The Word Processing module is designed as a tool for creating documents that may be used for any business purpose needed by your laboratory such as: Sales, Marketing, Customer Service, and Accounting.
For example, you may want to create a letter that the accounting department can mail for past due balances or special offers used to market a new product. This module supports all the functions available for a full Mail Merge program. These features allow users to insert Merge fields for Standard Address, Doctor Name, etc. instead of the actual value. Later, when the document is printed, the merge fields are replaced by the data taken from the Doctor's record in the database.
Navigation:
Marketing > Word Pro Documents or View > Word Pro Documents
Word Pro Documents navigation |
Word Pro Documents navigation |
Following form opens:

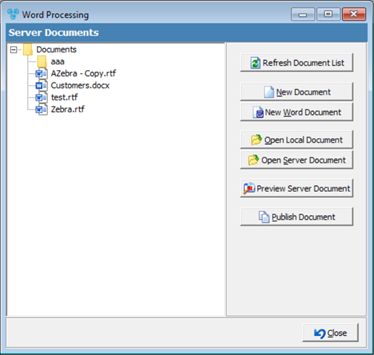
Word Processing
Word Processing consists of two parts, namely:
➢ Local Documents - Created on the local user’s computer or a shared file server folder, but they are not part of the DLCPM system and as a result are not accessible in the Folder View.
➢ Server Documents - Once a local document is created, and tested, it must be published to the server. Once it is published to the designated folder on the server, it will be accessible by all users. Server Documents may be copied by any user to their local documents and re-published but no user is allowed to modify the server documents directly.
1.Following the navigation path open Word Processing form. 2.Click on 3.MS Word should open. 4.You now can begin creating your document. |
1.Following the navigation path open Word Processing form. 2.Click on 3.Select the document from your computer to open it |
1.Once the document is opened, you will find a small icon with a tool tip of Insert Merge Field
2.Click on this icon and you will be presented with a list of available fields.
Merge fields 3.Now simply double click on the field you would like to use as part of this document. Here are some of the most commonly utilized fields: •CURRENTDATELONGSTRING - Prints the date when the letter is printed. •Doctors__StandardAddress_ - Prints the Doctor Address including the Practice Name. •Doctors__StandardAddress2_ - Prints the Doctor Address excluding the Practice Name. Please Note: Alternatively, you may also select the Name, Address 1, Address2, City, State and Zip Code individually. These merge fields were created to make it easier to print standard address fields. •DoctorsCRM_Dear - Prints the Dear field from the Doctor's record. •Netconnectionuserfullname - Prints the name of the user who printed this letter. •Netconnectionuseremail - Prints the email address of the user who printed the letter. •The most common fields are found in the table known as “Doctors”. Simply scroll through the merge fields and look for “Doctors_xxx” where xxx represents the data field such as City or State. For accounting purposes, you can select “Doctors_PastDue30”, “Doctors_PastDue60” and so on. 4.If you wish to test the merge feature and preview the document with data loaded, find and click the Icon located directly to the right of the ABC check icon on the main toolbar of the Word Processor. 5.Click the Icon next to the Insert Merge Field icon again to undo merging. 6.Now select Save or Save As option in Word and save the document to your local hard drive or shared network file server and return to DLCPM. |
1.Following the navigation path, open the Word Processing form. 2.Find the appropriate server folder such as Accounting, Sales or Marketing on the left side of the screen and select the folder. Please Note: Please keep in mind that the next step will publish the selected document to whichever folder is highlighted in the folder view. 3.Click on 4.Select the document that you created. 5.Click Open to confirm your selection. This document is now published to the server. Note: If you need to modify this document at a later time, simply choose the Local Document feature, make the necessary changes, Save and publish again. Note: Each time you publish a document to a given folder, the previous copy is destroyed and replaced with the new version. If you would like to maintain the revisions of a given Document, you must maintain it on your local drive or a shared file server folder. |
➢ Open Server Document - If you have lost your original Document, this option allows the document to be opened for you. If you plan to edit this document, you can not save it back to the server. You must save it locally, make your edits and then publish it again. ➢Preview Server Document - This option will open and merge a Server document so you can see how it would look with actual data instead of the placeholder Merge fields. ➢Add or Delete folders - Right Click on the Folder View to add or delete a folder. You may also right click on a document to permanently delete it directly from the server. These options may not be available to all users depending on security settings. |