Post Payment |

|

|
|
Post Payment |

|

|
Usage:
To enter a new payment click the Post Payment button on the Accounting tab on the Customer form or the Receive Payment on the Main left side menu. If you choose the first option then the Post Payment form will display and the Customer name will populate with the customer information corresponding to the customer record selected. If the second navigation option is your choice then Select a Customer for this payment form is displayed first and only after a customer is selected may you proceed with posting a payment.
Navigation:
Either Select the customer for which payment will be posted to then on 5. Accounting click on post Payment
Post Payments /View Payments options in Customer > Accounting menu
|
Or In the Main menu click on Receive Payment
and then select the Customer for which the payment will be posted to
Select Customer for the Payment form |
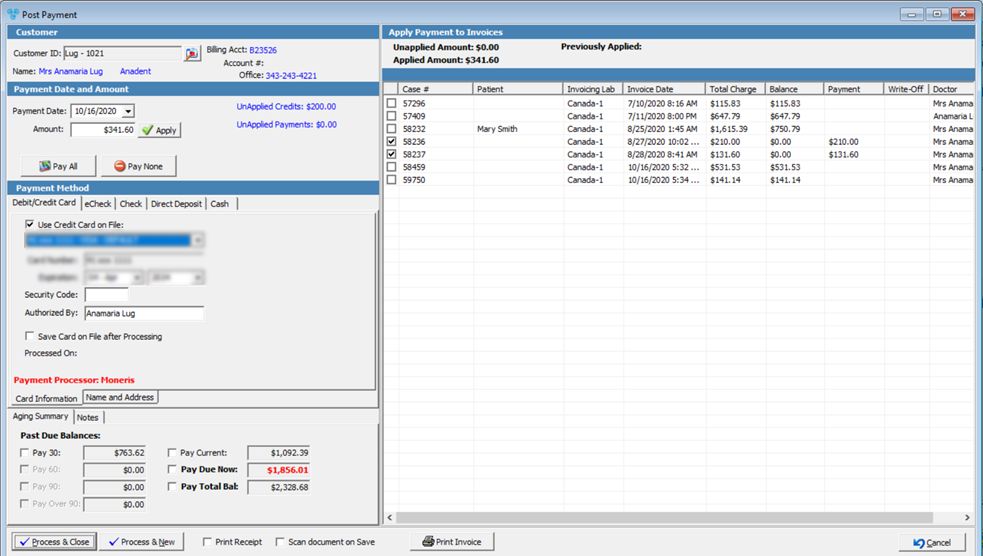
The Post Payment form will display:

Post Payments form
On the Post Payment form 1.Customer - This area displays the selected customer. If you wish to post a payment for a different customer click on the 2.Payment Date and Amount - Enter the payment date and also the amount of the payment you have received. You also have two buttons to either Pay All or Pay None. Note: Displayed next to the Amount field are any previously unapplied amounts, which include Unapplied Credits and Unapplied Payments. By clicking on them you will open the View Payments form where more details can be read. Note: Post Payment will display a warning message if the payment date is past the current period. 3.Select the Payment method. Choose between a Check Payment, Direct Deposit, Cash or Debit/Credit Card Payment. Enter the specific information for the option you have chosen: Check Number/Reference number or Credit Card Information. Note: If you pay using a Credit Card then you may check the Save Card on File option after you enter the card information. This way the next time this customer wishes to pay with the same credit card you simply check the Use Credit Card on File option and select the credit card from the drop-down list. You may edit or add more credit cards in Customer > Settings > Credit Cards menu. Note: If you pay using a Credit Card, there is an additional 'Name and Address' tab available. On this tab you are required to enter the card holder Name, Address, City, State, and Zip Code. If the customer's name is defined on the 0. Customer tab of the customer form, it will automatically populate. If the customer's address is defined on the 5. Accounting tab or the 0. Customer tab of the customer form, it will automatically populate. 4.Next is the Aging Summary for the selected Customer. You can choose to pay some amounts by simply selecting them. The corresponding cases will be selected on the right panel. 5.Notes is next to Aging Summary. Free text can be entered here. 6.Apply Payment to Invoice(s). The list of unpaid invoices is displayed on the right side of the form. Check the box in front of the Invoice you want to pay and enter the Payment Amount by clicking on the corresponding Payment field. Once you click on the payment field of one of the invoiced cases you can see that Previously Applied amounts are displayed right on top of the grid form. Also the Unapplied Amount is displayed. 7.Write Offs - While applying payments, you can indicate that the invoice in the list is a write-off. Click a field in the Write-Off column and enter the write-off amount. If the write-off amount is less than the total of the invoice, then the balance will update with the remaining balance.
8.Before saving you can check the Print Receipt to print out the receipt automatically once the payment is saved. You can always print another receipt when viewing the payment by clicking on Print Receipt button. 9.Click Process and Close when finished or Process and New if this payment is done and you want to enter a new one. |
|
See also: