Inbound Cases and Shipments |

|

|
|
Inbound Cases and Shipments |
|
|
Inbound Cases and Shipments |
|
|
|
Inbound Cases and Shipments |
|
|
Usage:
Inbound Cases and Shipments can be used to automatically send Customers a list of Incoming, Invoiced/Shipped, and On Hold Cases on the configured date.
1. Create a custom Email Template
Please note, the Inbound Cases and Shipments alert will be based on the Case's Invoicing Lab therefore each Invoicing Lab can have their own customized Template and Logo.
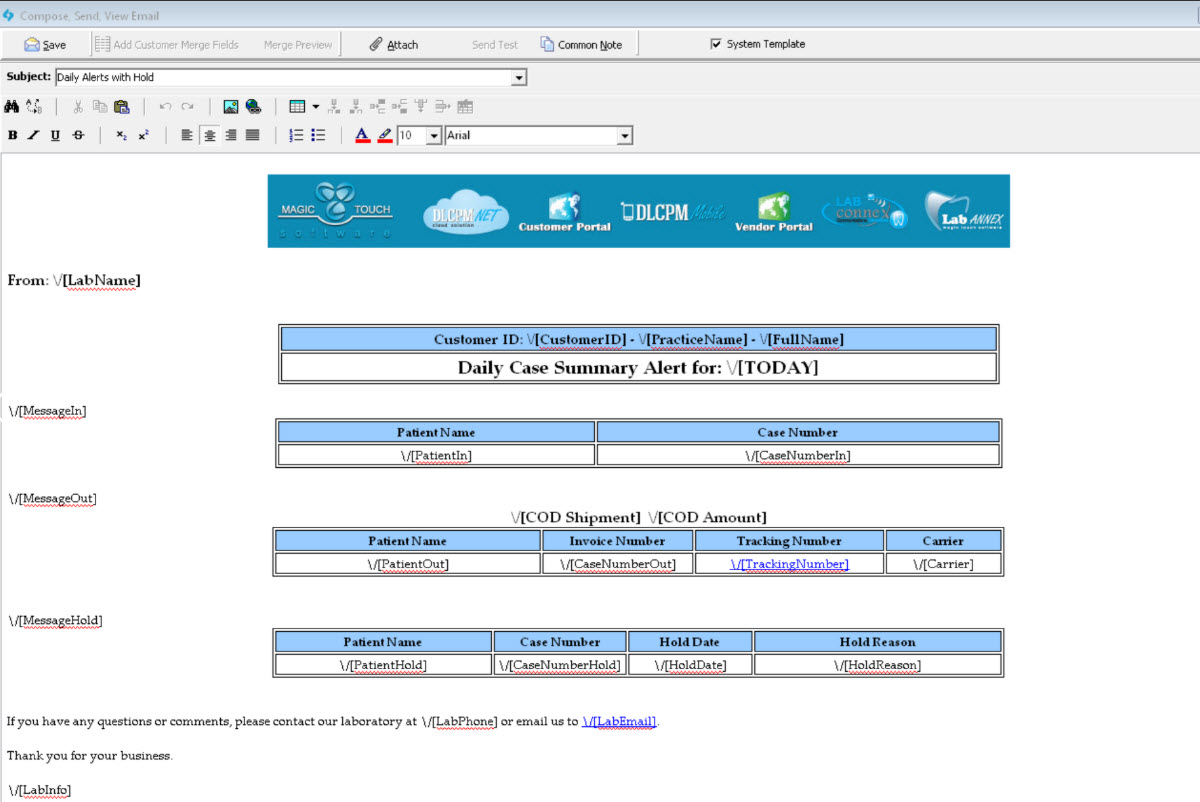
•Navigate to Marketing > E-Mail Templates > System Templates folder > select the Inbound Cases and Shipments Hold.eml > Make Copy > select custom folder > enter File Name > select > customize the Email Template. There are several variations of the Inbound Cases and Shipments Email Template. We would recommend reviewing each to find one that fits your Lab best.
2. Sections of the Template
•There are 3 sections in the Inbound Cases and Shipments Hold.eml.
oMessage In: This section will display Inbound Cases based on Date In or Create Date.
oMessage Out: This section will display Outbound Cases based on Invoice or Shipment Date.
oMessage Hold: This section will display Cases with the Status 'On Hold'
•Please refer to the Merge Fields help article for a list of available Inbound Cases and Shipments Merge Fields.
------ Steps 3 and 4 should be completed for each Invoicing Lab ------
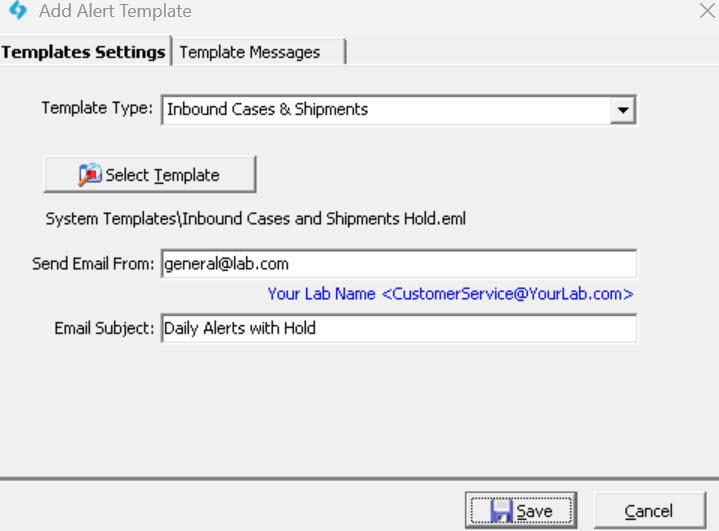
3. Assign the Email Template to each Invoicing Lab.
•Navigate to Global Settings > Laboratory Lists > Laboratories > select Lab > edit > Lab Templates.
•Add a new Template > select Template Type 'Inbound Cases and Shipments' > click 'select Template' to choose the Email Template created in step 1 > enter Send Email and Email Subject.
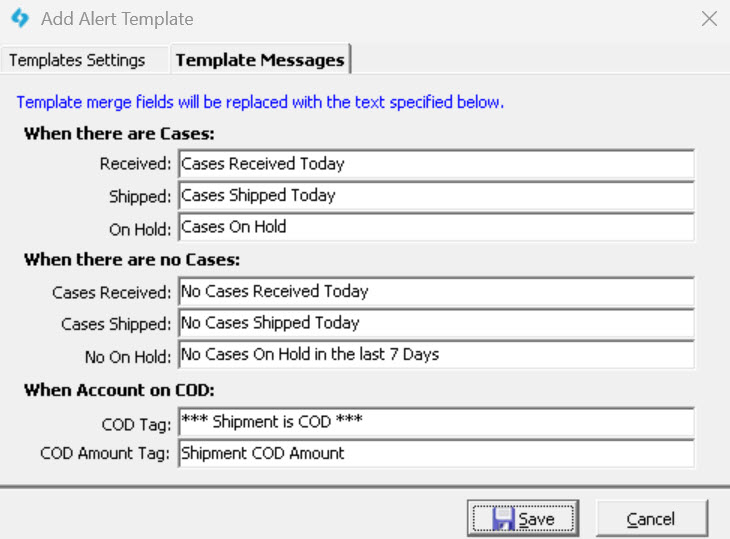
4. Configure Template Messages
•Select the Template Messages tab and enter a message that will be displayed in each section of the Email Template when there are Cases, when there are no Cases, and when the Customer has been placed on COD.
•The corresponding Email Template Merge Fields are \/[MessageIn] for Inbound Cases, \/[MessageOut] for Outbound Cases, and \/[MessageHold] for On Hold Cases.
5. Configure Inbound Cases and Shipments Job Parameters
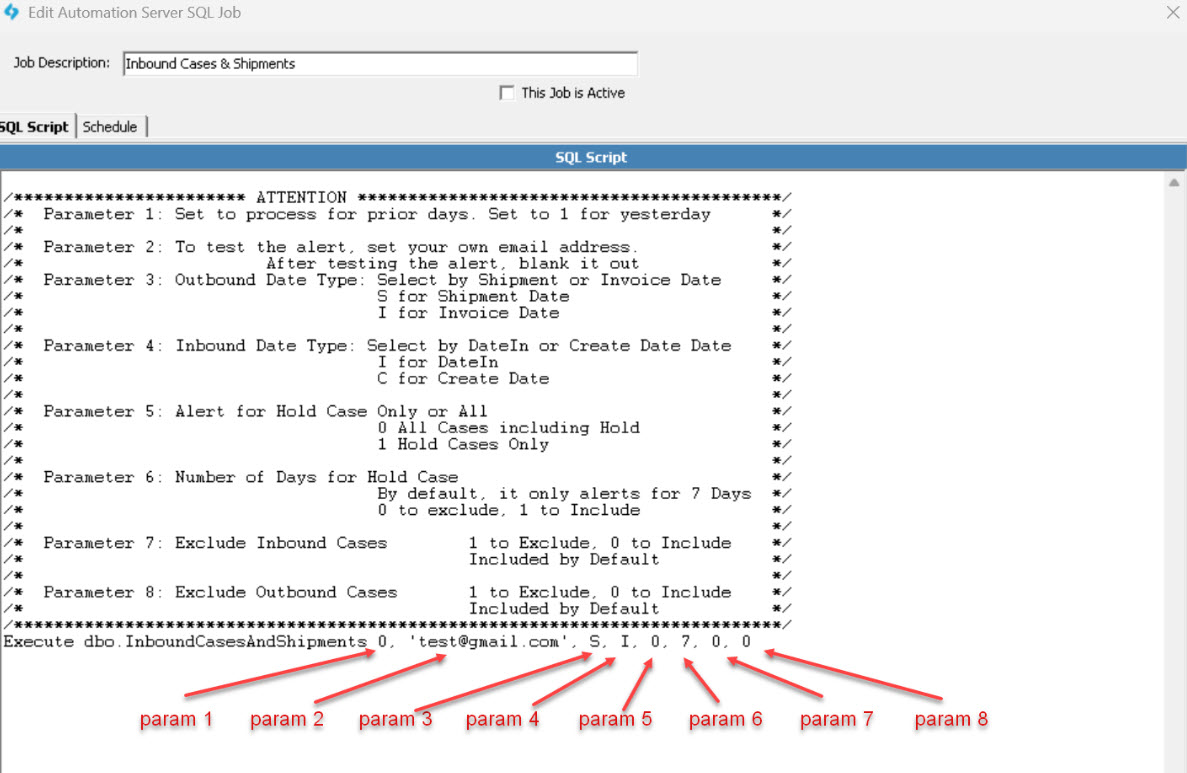
•Navigate to Automated Services > Job Management > select the Inbound Cases and Shipments Job > Modify Job
•Update the corresponding parameters
oParameter 1: If set to 0, all Inbound/Outbound Cases on the current day will be included. If set to 1, all Inbound/Outbound Cases on the previous day will be included.
oParameter 2: To test the Alert, this parameter should include the user's email address. To run for all Customers, leave as ' '.
oParameter 3: Include Outbound Cases based on Shipment Date 'S' or Invoice Date 'I'.
oParameter 4: Include Inbound Cases based on Date In 'I' or Create Date 'C'.
oParameter 5: Set to 0 to include all Cases. Set to 1 to only include Hold Cases in the alert Email.
oParameter 6: Set to 0 to exclude Hold Cases. Set to 1+ to determine the number of days a Customer should be alerted for the same Hold Case.
oParameter 7: Set to 0 to include Inbound Cases. Set to 1 to Exclude Inbound Cases.
oParameter 8: Set to 0 to include Outbound Cases. Set to 1 to Include Inbound Cases.
By default, only the first 5 parameters are set. To add parameters 6-8, add a comma then the parameter value. For example:
6. Schedule the Job
•After configuring the parameters, the schedule can be set using the Schedule tab.
•The job is expected to run once a day at the set time.
•There is also an option 'Do not run the job on Weekends or Holidays' to ensure Customers only receive emails on Weekdays.
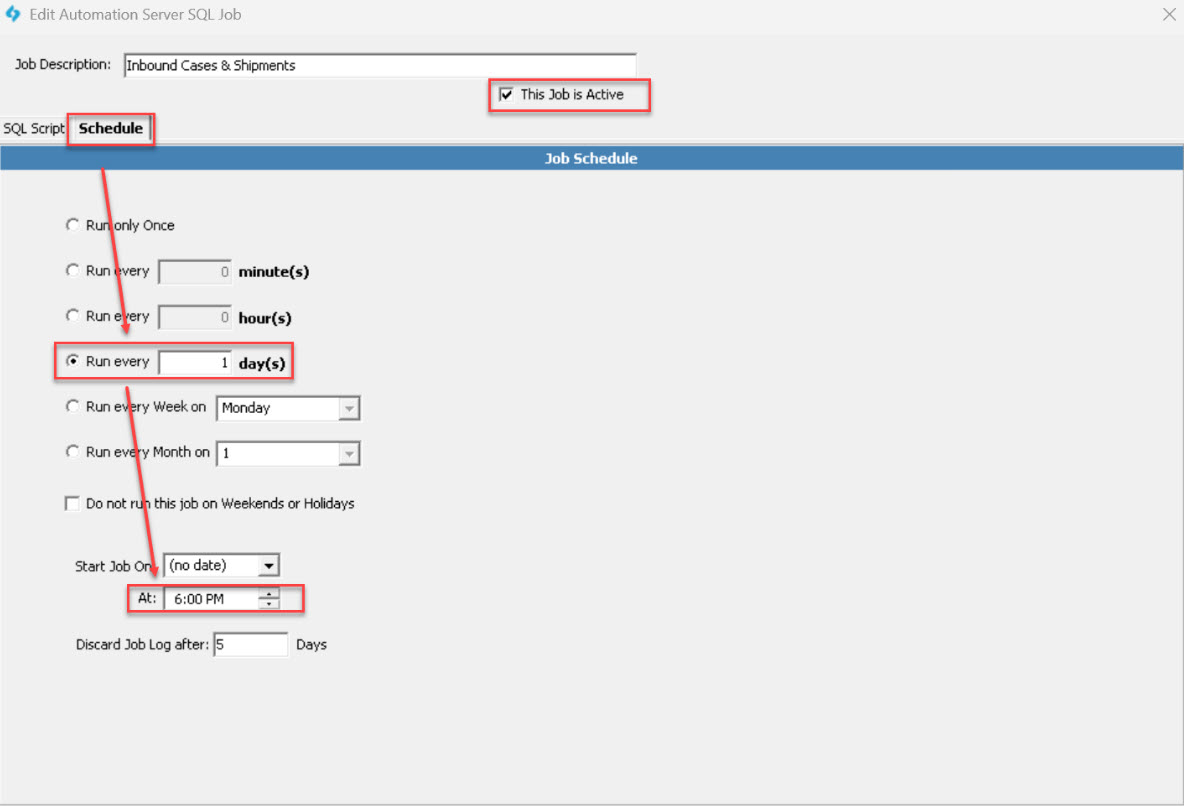
Once the schedule has been configured, check 'This Job is Active' and Save.
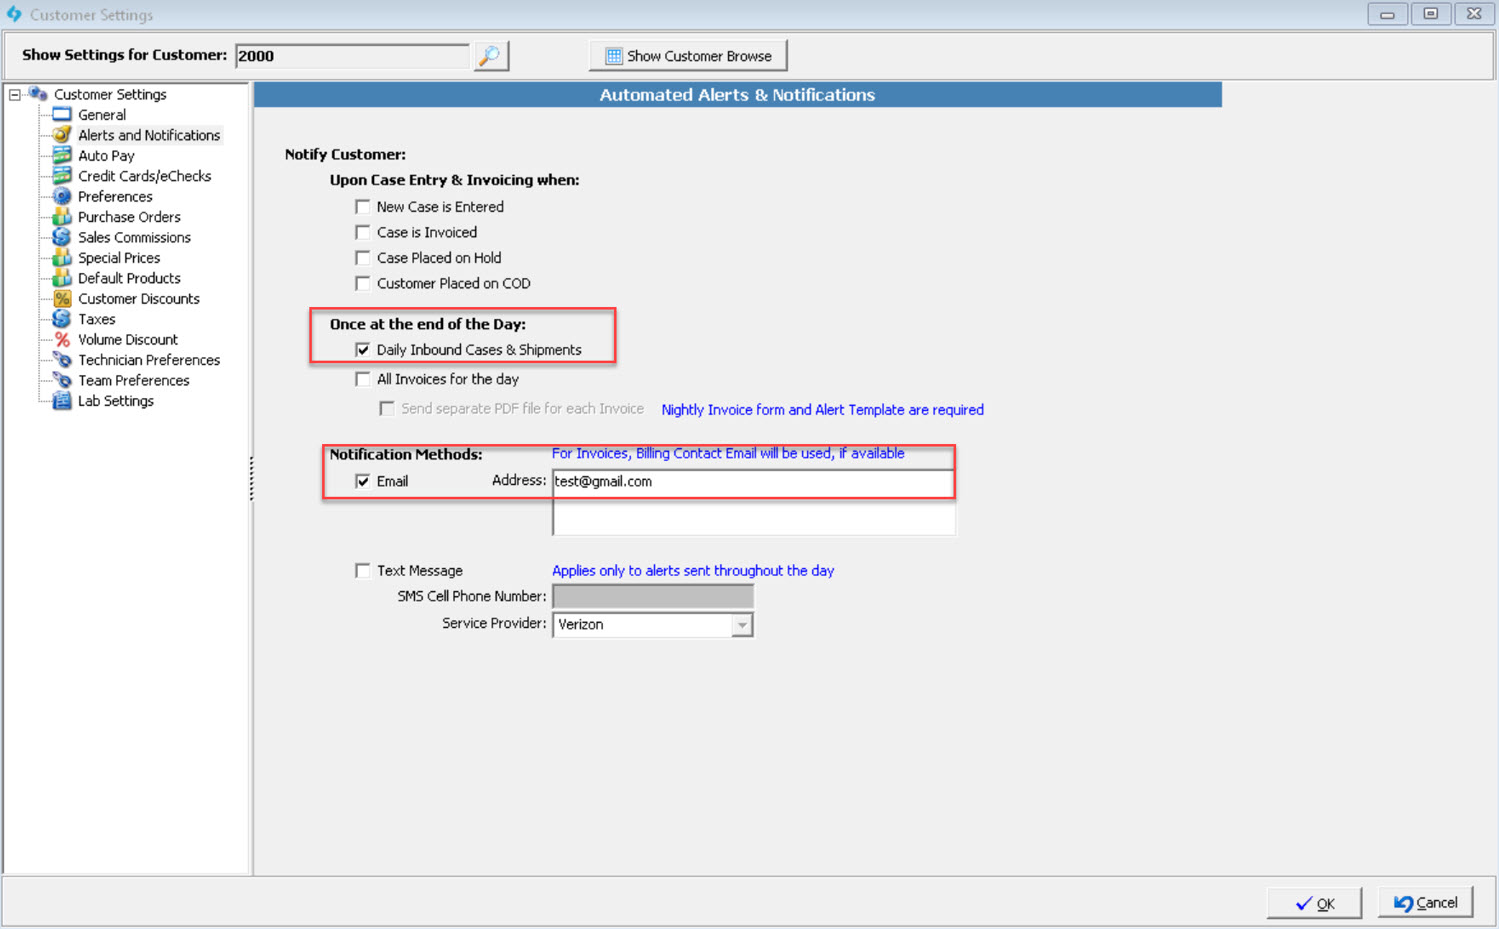
7. Enable Customer Settings
•The Inbound Cases and Shipments alert must be configured for each Customer that should receive the alert.
•To do this manually, navigate to the Customers form > select a Customer > Customer Settings > Alerts & Notifications > select Daily Inbound Cases and Shipments. Please email support@magictouchsoftware.com to submit a database request to enable this Alert for all Active Customers.
•The alert will be sent to the Customer's Alert Email
8. Testing
•Before rolling out to all Customers, we would recommend enabling the Alert on a test Customer's Account then Invoicing/Shipping Cases.
•Parameter 2 in step 4 can be configured for further testing.