Import/Export Digital FIles |

|

|
|
Import/Export Digital FIles |
|
|
Import/Export Digital FIles |
|
|
|
Import/Export Digital FIles |
|
|
This is the lab's configuration tab for DLCPM's Digital File Transfer. Enabling this feature will facilitate the export and import of files from the laboratory's cases to designated folders. This simplifies access for Digital Designers, avoiding the need to access individual case files.
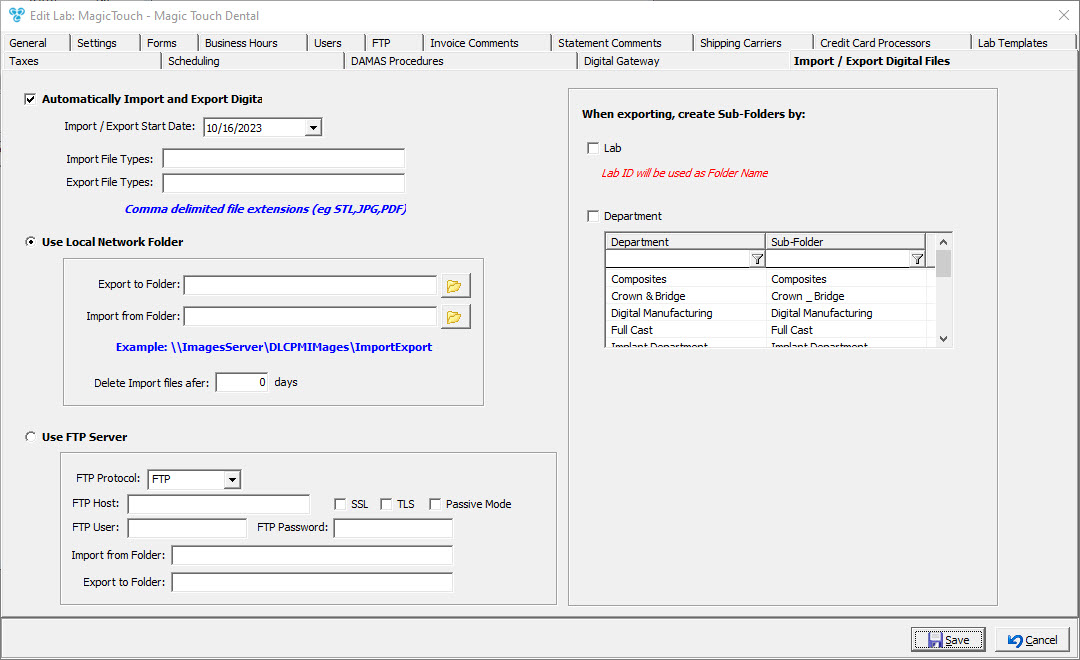
Import / Export Digital Files form
Configuration of the Import/Export Digital Files Form:
•Automatically Import and Export Digital Files: This option activates Digital File Transfer for the laboratory.
•Import/Export Start Date: Specify the date when Digital File Transfer should start exporting and importing files.
•Import File Types: Define the file types that DLCPM will consider for import into DLCPM Enterprise. The importable files are located in the designated Import Folder.
•Export File Types: Define the file types that DLCPM will consider for export from DLCPM Enterprise to the primary Export folder.
Setting up the File Storage Folders:
There are two ways to setup the folders to store the files imported/exported.
1.Use Local Network Folder - this requires the server to have access to the desired folders. For Hosted Customers, this is not allowed and using a FTP server is preferred for now.
oDelete Import Files After: Set the number of days for Digital File Transfer to retain imported files.
2.Use FTP Server - This option mandates that the laboratory has a pre-established FTP server. This is the preferred option available for Hosted Customers.
a.FTP Protocol
b.FTP Host
c.SSL
d.TLS
e.Passive Mode
f.FTP User
g.FTP Password
Both options requires the selection of folders for storing the exported and imported files:
1.Export to Folder: Specify the path to the designated Export Folder. This is where all exported files will be located, enabling Digital Designers to directly access and modify the files.
2.Import to Folder: Specify the path to the designated Import Folder. After Digital Designers make necessary adjustments to the files, they can move the files to the Import Folder for Digital File Transfer to import them back into DLCPM Enterprise, attaching them to the respective cases. Please note that
Naming Convention for Exported/Imported Files: Exported files will follow this convention - DLCPM_{CaseNumber)_{PatientName}.{ext}. Digital Designers can open the files, make adjustments, and save accordingly.
If they need to import the files back to the system and get attached to their corresponding cases, Digital Designers would have to save the files in the designated Import Folder with the same naming convention. If they are modifying the exported files, it is highly advised not to alter the file's name.
When exporting files, sub-folders can be created within the primary Export Folder:
1.Lab - if checked, exported files will be stored in a sub-folder named after the case's Invoicing Lab.
2.Department - if checked, exported files will be stored in a sub-folder named after the Product's Department.
Activating Digital File Transfer:
Once a Lab is configured properly to use Digital File Transfer, users can then activate the automation service "Import Export Digital File."
Files will be exported or imported based on the job's scheduled configuration.
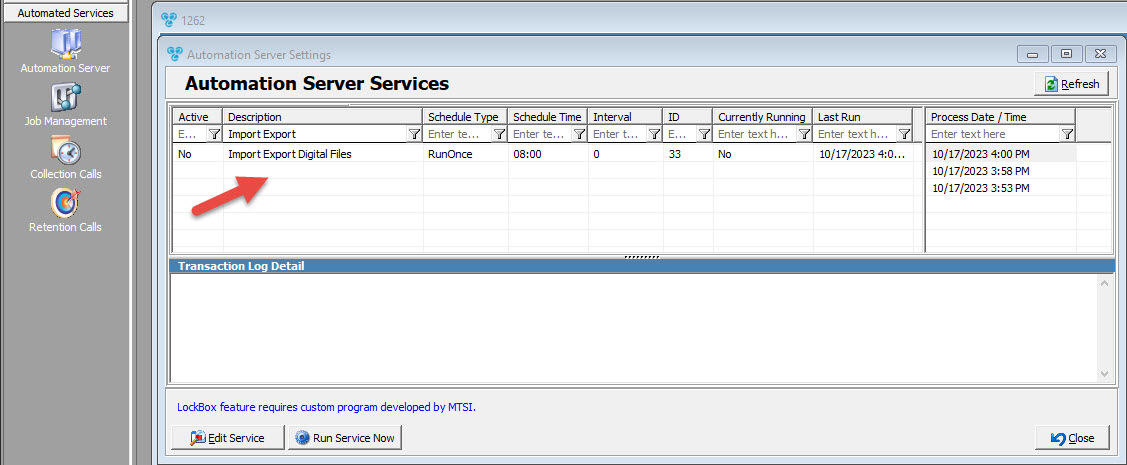
Import Export Digital File job