|
UPS |

|

|
|
|
UPS |

|

|
UPS
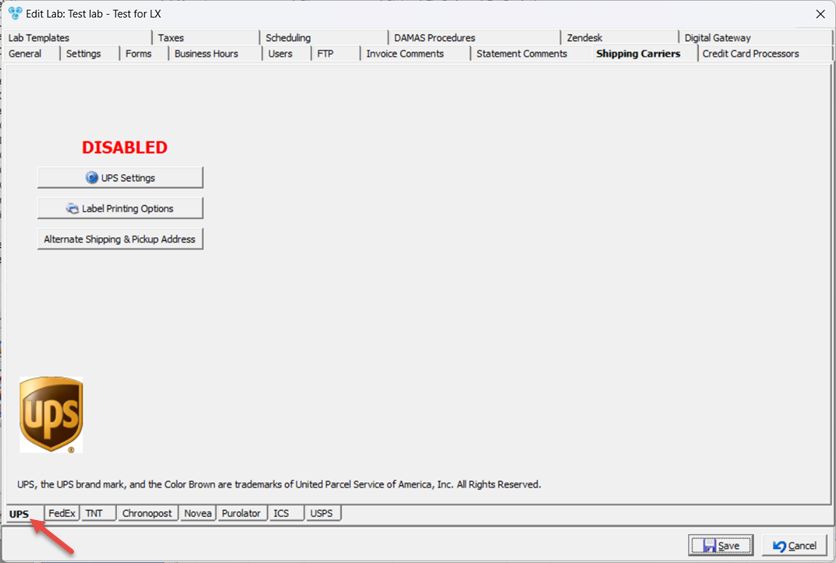
Each Lab may have their own shipping account. These are the UPS Shipping options:

Shipping Carrier - UPS tab
1.UPS Settings

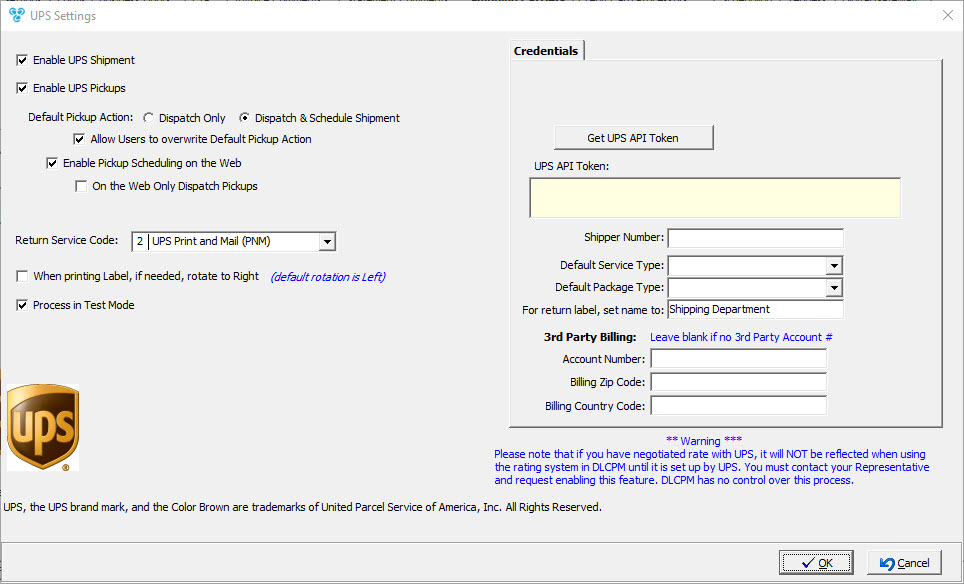
UPS Settings
a.Enable UPS Shipment - to allow shipping with UPS
b.Enable UPS Pickups - to allow pickups with UPS
➢Select Default Pickup Action between Dispatch Only or Dispatch and Schedule Shipment
➢You may Allow Users to overwrite Default Pickup Action - this will let users to decide between Dispatch Only or Dispatch and Schedule Shipment regardless of the default setting.
➢You may Enable Pickup Scheduling on the Web. If you do so, then you may restrict the Pickups on web by checking On the Web Only Dispatch Pickups
c.Select Return Service Code.
d.When printing UPS labels, if needed, rotate to Left or Right - default rotation is Left.
e.You may Process in Test Mode.
f.Get UPS API Token - generates a token required to use UPS services, such as creating shipments.
Please Note: Getting the token need to be performed only once. This will only ask for the username and password of the UPS account.
➢Fill in valid information for Shipper Number.
➢You also need to select a Default Service Type that will be the default type when a shipment is scheduled. Select from the options listed in the Default Service Type drop down list.
➢Select Default Package Type.
➢For return label, set name to - enter name
➢3rd Party Billing - enter Account Number or leave blank if there is no 3rd Party Account # This field should only be populated if all shipment activity completed using the integration should be billed through a third party account number. If all activity should be billed through the main account, this field should be left blank.
Please Note: That if you have negotiated rate with UPS, it will NOT be reflected when using the rating system in DLCPM until is set up by UPS. You must contact you Representative and request enabling this feature. DLCPM has no control over this process.
2.Label Printing Options:
➢ click on ![]()
➢Shipping Label Options form displays

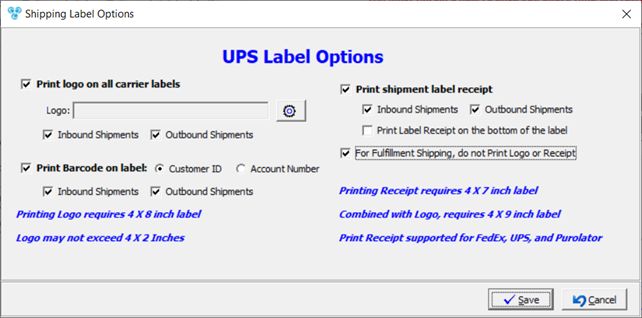
Shipping Label Options
➢ Print logo on all carrier labels - printing logo requires 4X8 inch label.
•Enter Logo - Logo may not exceed 4X2 inches
•Select Inbound and/or Outbound Shipment
➢Print Barcode on label - if checked the select on what label to print between Customer and Account Number and select printing for Inbound and/or Outbound Shipment
➢ Print shipment label receipt - check if you need to print shipment label receipt. Following there are some options for this label
• Select printing for Inbound and/or Outbound Shipment
• Print Label Receipt on the bottom of the label - not supported with Novea. Printing Receipt requires 4X7 inch label, combined with Logo, requires 4X9 inch label Print Receipt supported for FedEx, Ups and Purolator
➢ For Fulfillment Shipping, do not Print Logo or Receipt.
➢Click ![]() when done.
when done.
3.Enter if necessary Alternate Shipping and Pickup Address - you can add alternate Outgoing Shipments address and alternate Incoming Pickups addresses.
➢Click on ![]()
➢Alternate Shipping and Pickup address form will open

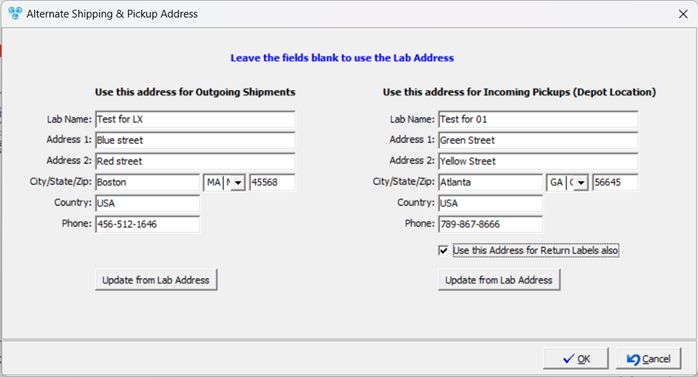
Alternate Shipping and Pickup address form
Please Note: If you wish to use the Lab address the leave the fields blank, or use the ![]() button to update Outgoing or Incoming addressees with the Lab Address.
button to update Outgoing or Incoming addressees with the Lab Address.
➢Enter Address for Outgoing Shipments
➢Enter Address for Incoming Shipments (Depot Location)
➢Check Use this Address for Return Labels also if you need the same address for the Return Label.
➢Click ![]() when done.
when done.
See also: