UPS |

|

|
|
UPS |

|

|
Traditionally, labs needed to logon to a carrier’s web site to schedule a pick-up. Additionally, when invoicing cases, they also had to go to another computer provided by the carrier to create shipments. These processes are time consuming and the information such as pick-up requests and tracking numbers are not recorded with the customer account. DLCPM provides integration to resolve these issues and optimizes the processes. The integration with FedEx & UPS will provide a number of benefits: ➢Ability to schedule pick-ups and create labels from within DLCPM ➢ Create shipments including shipping labels while invoicing cases ➢ Provide your customers with the option to schedule their own pick-ups directly from the web (requires Customer Web Portal service) ➢ Track all transactions with the customer accounts for future reference
Requirements: In order to use the integration services, you must register with the respective carriers. This registration is required even if you already have an account. It is strongly recommended that you contact your account representative for assistance.
Important: If for any reason you need to contact UPS Support regarding your account and the integration, please state that you are using a UPS Certified software with Magic Touch Software. This will ensure you are routed to the correct UPS Support teams. Please note that only the following UPS service types are supported for shipments that are sent outside the United States and Puerto Rico.
1.UPS Worldwide Saver 2.UPS Worldwide Expedited |
|
UPS Integration
The UPS integration uses XML API or XML Shipment Request. During the registration process, you will be asked which tools you are interested in.
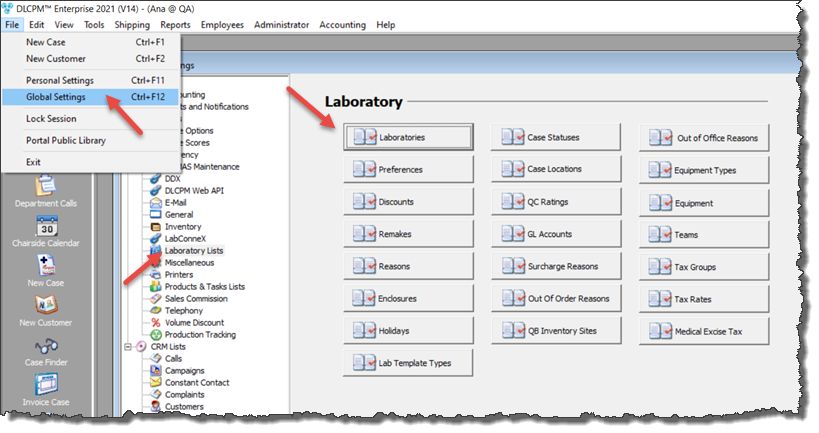
1.Please navigate to File > Global Settings > Global > Laboratory lists > Laboratories

Laboratories navigation
2.Double-click on your lab from the resulting list, then click on the Shipping Carriers tab, and then the UPS sub-tab. Click on the UPS Settings button to setup the account.

Shipping Carriers form
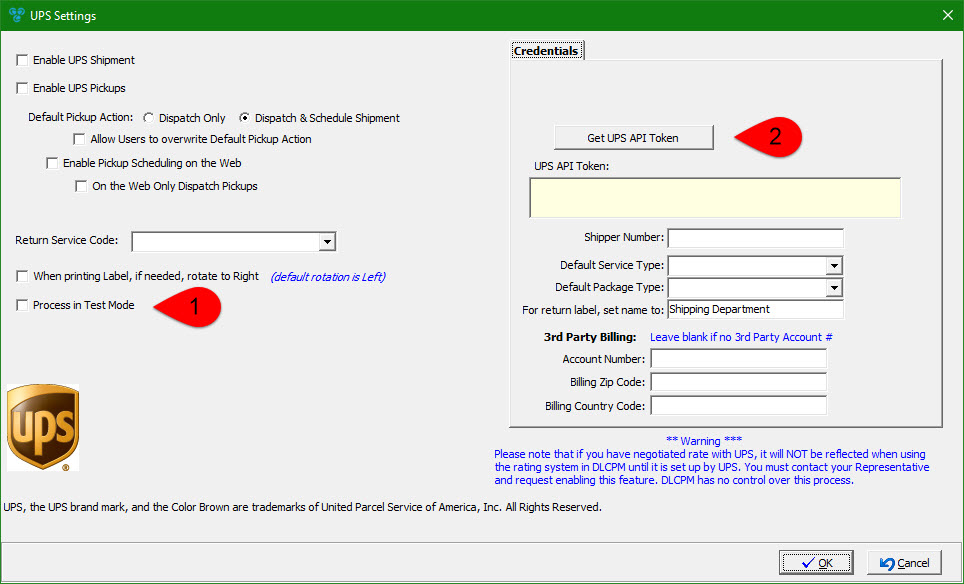
3.Be sure that the "Process in Test Mode" checkbox is NOT selected before clicking the "Get UPS API Token" button.

UPS Settings form
4.Clicking on the "Get UPS API Token" button will open up a web page from UPS, asking for the email or username to access your UPS Account.
5.Enter an email or username and check the available checkbox, authorizing DLCPM Enterprise to access necessary data associated with UPS, and then click ‘Continue’.
6.UPS will prompt for the password to your UPS account.
7.Enter your password and click login. If successful, UPS will let you know that a token was generated successfully and the webpage can be closed.
8.Back in DLCPM, the generated token should already be populated. Ensure the other fields are populated and then click 'OK' button to save.
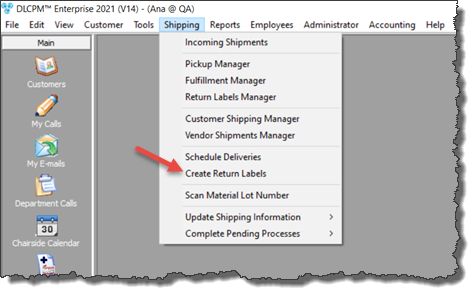
9.Create a test Return Label to ensure that your account has been properly registered. Click on the “Shipping” menu in the top navigation row, and then select “Create Return Labels” from the resulting sub-menu.

Create Return Labels navigation
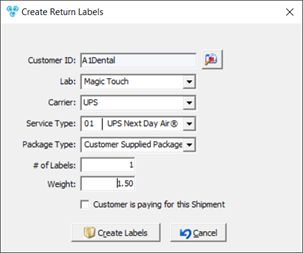
10. In the resulting form, select a customer, set the Carrier to UPS, select a service type, and click Create Labels. If the label is created and can be printed out, your UPS integration is complete.

Create Return Labels form
Please note: When you print out a return label, you must ensure the label does not read SAMPLE on it. Once verified, please make sure to navigate back into the Global Settings and check "Process in Test Mode" for now until you are ready to create live shipments and pickups.