Prior Statements |

|

|
|
Prior Statements |

|

|
Usage:
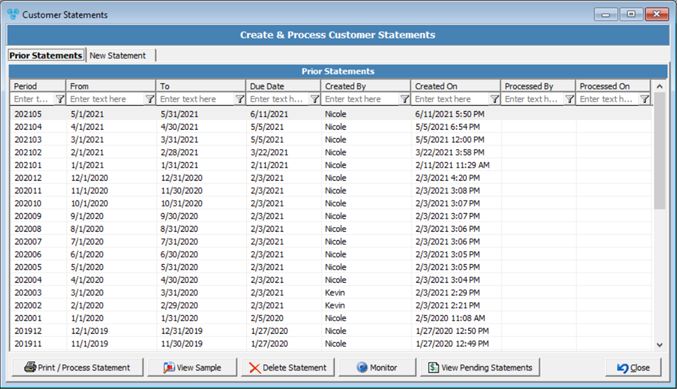
Prior Statements is the first tab on the Customer Statements form displaying previously created statements which can be printed/processed again, printed or deleted.
Navigation: Accounting > Create and Process Statements

Customer Statements form
The difference between Print and Process Statements is that if you select Print, the Statements will just print, otherwise the statements will be automatically e-mailed based on customer preference. 1.In the Customer Statements form, on the Prior Statements tab click on 2.The Statements form displays:
Print and Process Statements 3.Select between Print Statements for: •Customer and Billing Accounts - Will print all statements. Enter the required values to print exactly what you would like to: ➢Select the Lab you wish to print for in Print for Lab dropdown. ➢Only Process for customers with Statement Class.... - If this option is checked a statement class will need to be selected from the drop down list. By selecting it, the Print Statements for option will automatically be switched to Customer Only. ➢Do not Process Statement with zero balance - this option applies ONLY to Customers with Zero Balance with Activities. ➢Do not Process Statement with negative balance. ➢Choose between Print All Statements and Print Range By. If the option Print Range by is selected then users must enter the key value and its range. Please note, with Customer and Billing Accounts selected, the “Statement Balance” range will apply to both Customer and Billing Account but any other range selected will only apply to Customers. ➢Select the Print Order between Customer ID, Account Number, State, Zip Code, Last Name or Statement Class. ➢Select the appropriate Printer. •Customer Only - Will print Statements for Customers only. Enter the required values to print exactly what you would like to: ➢Select the Lab you wish to print for in Print for Lab dropdown. ➢Only Print for customers with Statement Class.... - If this option is checked a statement class will need to be selected from the drop down list. ➢Select if you Do not want to Print Statement with zero balance - this option applies ONLY to Customers with Zero Balance and NO Activity. ➢Select if you Do not want to Print Statement with negative balance. ➢Choose between Print All Statements and Print Range By. If the option Print Range by is selected then users must enter the key value and its range. ➢Select the Print Order between Customer ID, Account Number, State, Zip Code, Last Name, Statement Class or Statement Balance. ➢Select the appropriate Printer. •Billing Account Only - Will print Statements for Billing Accounts only. Enter the required values to print exactly what you would like to: ➢Select if you Do not want to Print Statement with zero balance. ➢Select if you Do not want to Print Statement with negative balance. ➢Select the appropriate Printer. Note: In all cases if you choose a different printer than the default one, you can access the Settings menu for the selected printer and you may customize the printer. Different options are available depending on the printer you have selected. 4.Select Action: •Process Statement - Print or E-mail based on Customer Settings. •Print all Statements - Print all statements regardless of the Customer Settings. •Re-Process Statements: ➢E-mail Only ➢Print Only 5.Click on 6.Select Yes when prompted for confirmation. Note: Printing or Processing statements may take a few minutes so the process runs in the background allowing you to perform other operations in the meantime. To view what the status is at any time click on |
1.In the Customer Statements form, on the Prior Statements tab select the statement that will be viewed by selecting the record. 2.Click on 3.The statement will display similar to the following:
View Sample Statement |
1.In the Customer Statements form, on the Prior Statements tab, select the statement you wish to delete by selecting the record in the grid. 2.Click on 3.Select Yes when prompted for confirmation. Please Note: You may only delete the last statement created and only if there has not been any activity since creation. For example, if you create a statement, and invoice a case immediately after you will be unable to delete the last statement created. |
View Pending Statements will display the list of Pending Statements with an option to re-queue. This form can be viewed while statements are creating or after the countdown has stopped from the monitor form. 1.In the Customer Statements form, on the Prior Statements tab click on 2.Pending Statements form display all pending statements.
Pending Statements 3.To Re-queue click on 4.Select Yes when asked for confirmation. |
See also: