Add multiple products |

|

|
|
Add multiple products |

|

|
Navigation: Customer > 4. Cases
Create or open a case for edit. For more details about creating a case see How to create a case section.
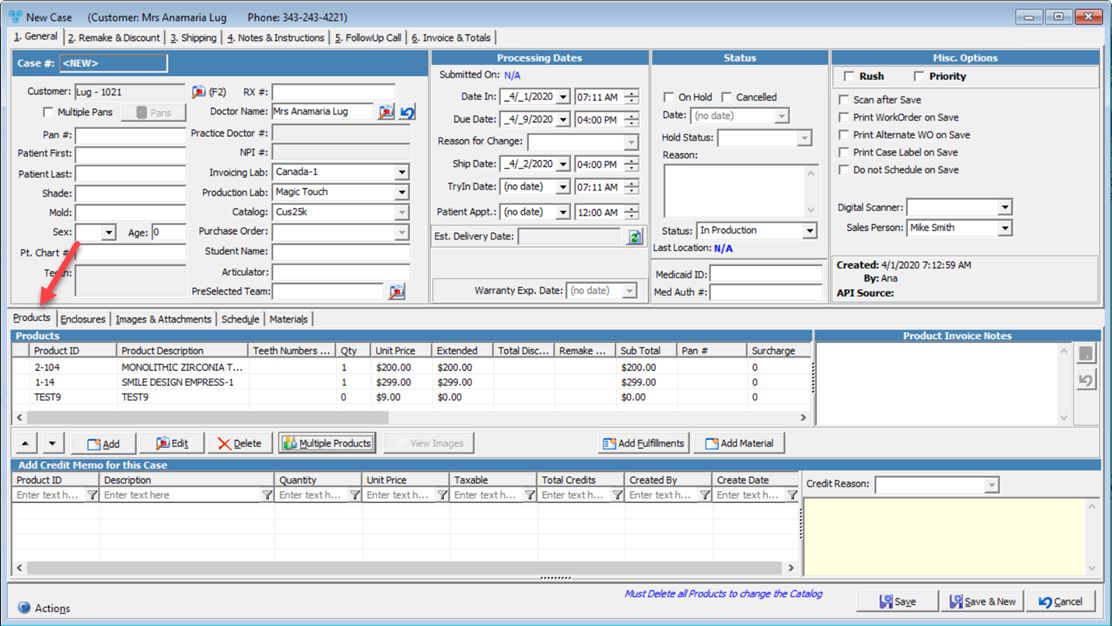
1.On the New Case form on 1.General tab select Products tab and click ![]()
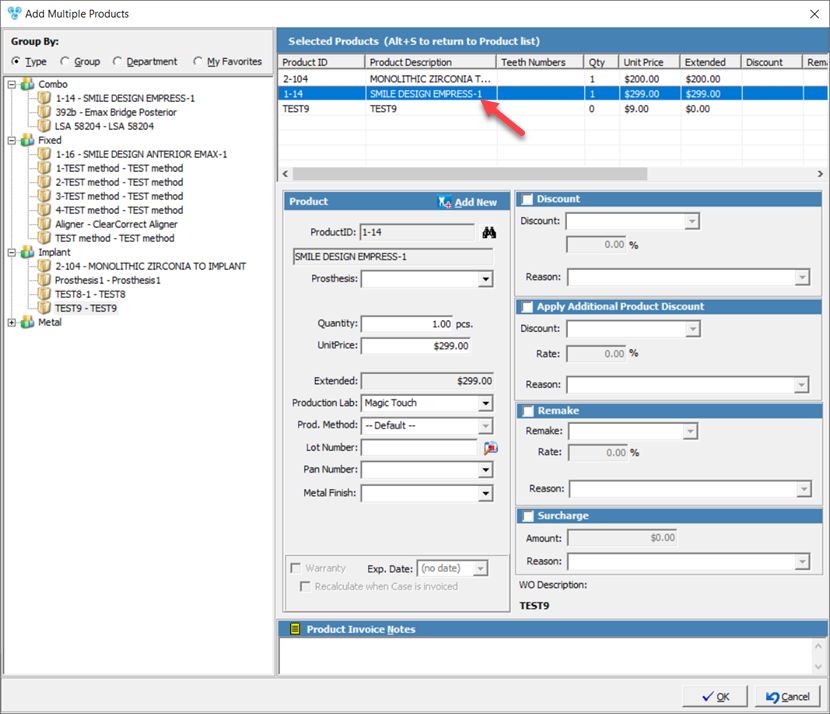
2.Add multiple Products form will open.
All existing products are displayed on the left side of the form. These are grouped by Type, Group, Department or My Favorites for a more easy approach.
If there are any products already added to the case these will be displayed on the upper right side. Also the products that will be added will be displayed there.
If you click on a product in the Selected Products list, it's details will be displayed in the section under the grid. |
Add Multiple Products form |
3.Search the Product you want to add in the Product list displayed on the left side
4.Right Click on the selected Products and click Add to Case.

Product CAPTCP was added and details of it are displayed
5.Click on the Product that was added to the grid to see details before adding it to the case. Following details are displayed
➢ProductID is populated with the selected products ➢The Product Description is displayed Depending on the Product Settings form, the next fields may vary based on each products configuration: ➢Restoration - when entering a Case, if the product is Restoration, user will be prompted to enter the tooth number ➢Prosthesis - if the product is Prosthesis, user may select Upper Arch, Lower Arch, or type a user defined text ➢Quantity is set by default to the Minimum Quantity set on the Product form. It can be changed to any value between Minimum Quantity and Maximum quantity. ➢Unit Price is populated with the Product's Unit Price. You can change the price to any other value, unless Allow to Change Price is unchecked on Products form for this product. ➢Extended: is the result of the Quantity multiplied by the Unit Price ➢Production Lab is the Laboratory name where the product will be produced. It defaults to Case Production Lab, but can be changed if needed. ➢Select Production Method if any is available. Is DEFAULT, but also can be changed if the product has more than one method to be produced. ➢Lot Number - you can specify a lot number for the product by clicking on edit and selecting one number from the list. If there is no Lot Number please add them first in File > Settings > Global > Products & Tasks Lists > Lot Numbers form ➢Enter Pan Number. ➢If the selected product has Translucency (TL) or Shades, two drop down list will be available. If TLs & Shades are defined for the selected product, users will not be able to save the product until they select a valid TL or Shade. ➢ Select the Metal Finish from the list of available options defined in the maintenance section ➢Inventory Site ➢Warranty, Exp. Date ➢Recalculate when Case is invoiced - when checked will recalculate the Warranty Exp. Date when the case is invoiced. |
Fields that are populated by default after Product is selected |
6.To remove an added Product from the list just right click on it and click Remove.
7. On the Add Multiple Products form you may also add:
➢Apply Additional Product/Quantity Discount
8.Enter Notes if necessary.
9.You can now click Save and the Products will be added to the case. You can repeat the above steps to add as many products as needed.

Product is added to the case